
![clip_image001[1]](https://blogger.googleusercontent.com/img/b/R29vZ2xl/AVvXsEjRYeQfUxOiLv8HCcDNPWx_qOfOTSH0T7RYM5HoGEK_fGwD9SCgL-3GIuhQc6nGassD2WWqksp-AY2ECfFhuojNc_dbT9HkiTJYZWuVXT5sZP6bt_N9uTV-sNIfWxGbjoe_BxFHFszu_feS/s1600-h/clip_image00116.jpg "clip_image001[1]")
Start off Easter morning with one of these adorable pancake variations! Your little ones will be excited to see the creation made! You can even have them get in on the fun and help you make breakfast.

![clip_image001[4]](https://blogger.googleusercontent.com/img/b/R29vZ2xl/AVvXsEhsfAIvRUjQVfcpoxN2Tc0krC4L5NAgixfTLbNI4w8Thra9EMFaL979FIDwFsLbKyCFH0SfaUP3qcYbuKsD1ISh0kN5XT61Uw3Pxn6_j8FXKSTXSvynhMBcd18Qvq07qR7A_taXwGEzfcB7/s1600-h/clip_image00147.jpg "clip_image001[4]")
Looking for something easter themed to snack on and also satisfy the sweet tooth? Try one of the following choices that include a bit of chocolate.
This fun spin on the traditional smore is guaranteed to be a child favorite! Replace your typical marshmallow with an Easter peep. The colors give it a fun new look and make for the perfect sweet snack!
![clip_image001[6]](https://blogger.googleusercontent.com/img/b/R29vZ2xl/AVvXsEixKjaeVAic9yOQNMIAu08Yd64HCw0jHdSqvQNKuAXb_7XZC53xM1Y_QKlZ2Fd8TWkW3CvTzELxDxksFHsh-Q2nLKZhyR5z_RsY9COn7C1Ve8Jol9QLQjKhAxfl69ugIvRfWrxVTv-DnUvx/s1600-h/clip_image00162.jpg "clip_image001[6]")
If you are looking for something a little on the healthier side then try out these adorable strawberry carrots! Use white chocolate with a bit of orange food coloring to give your chocolate covered strawberries a new carrot appearance!

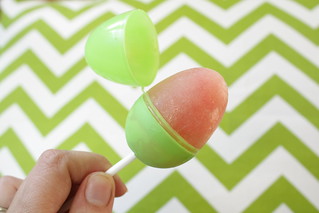
Last, but not least, is my personal favorite! Using plastic Easter eggs, take a nail or something round and sharp to puncture a hole into the top. The hole needs to be large enough for a lollipop stick to fit into. Once you have created the hole, take a funnel and pour your favorite PureFUN! Juice flavor into the closed egg. Next, add in the stick and place the eggs into the freezer. Once frozen, you end up with an adorable Easter egg popsicle!
Tip! Give the popsicles a few minutes on the counter to make it a bit easier to open the top. You can also easily pop off the bottom portion of the egg if desired.


![clip_image001[4]](https://blogger.googleusercontent.com/img/b/R29vZ2xl/AVvXsEgODeaNS6-og20Sf8vbDJ3cqw6zXQTOJXRXbCr3qTxxu8Ow3-wHW2h6jBu0K_ylVNddw9OJ9vR6HXS9PJ7ZteOqV9NBPjWQIzugmDWEvvHLipCbyH7jQb3CMRkoXxqrdt5WoIsWWWlR0M3i/s1600-h/clip_image00143.jpg "clip_image001[4]")
![clip_image001[7]](https://blogger.googleusercontent.com/img/b/R29vZ2xl/AVvXsEg1WE3zM9EjZZ9q9iPmtgg01yplTI-jzpaCh8I33ixs7r8XXtR2IrxlNz_gv9nA-KuqqDiCe-9T6lr40kr1FWUqOz-P9t8j4LybUNAoSpONcoxr_XhlMmShpjX2SfsilZNWJKB3suehx7kd/s1600-h/clip_image00173.jpg "clip_image001[7]")

![clip_image001[9]](https://blogger.googleusercontent.com/img/b/R29vZ2xl/AVvXsEgCC3lAuxnwIXYUs0VEut65gtnpJPczKnZ_XhGLijsnjaZN0-X0UhxmUxdY7NOo3fPjR-KAXgkcEW4yvgCCFPRPFeifBiNUuKbsAxcYs4ITFsaqmZkwQ-tppiBKyEj4qDisEb3fapwoaxQl/s1600-h/clip_image00199.jpg "clip_image001[9]")
![clip_image001[11]](https://blogger.googleusercontent.com/img/b/R29vZ2xl/AVvXsEjWQ_g8S0yraQKUocnwFd6ObQdzY-4ZWbbrztuNKcvndO8HsbSGO3AvwghyphenhyphenMZlNuMoXFK1ajF_4nU7XYyXmqsY4iPD-gkc62CBskPkXIPjB7uO5CAXkodQZajuC72yfRqGcOeZg5M8JWEN7/s1600-h/clip_image001115.jpg "clip_image001[11]")