Showing posts with label holidays. Show all posts

Wednesday, November 10, 2021

3 Ways to Celebrate World Kindness Day in Your Classroom


Want to know how you can change the world?  Famous actor Morgan Freeman says you do it with “one random act of kindness at a time.”

We hear a lot of people talk about “random” acts of kindness.  What does that mean?  The Oxford Dictionary says anything random is “done without method or conscious decision.”  Perhaps a better word to describe these acts of kindness is “unexpected.” To recipients these acts seem random.  But for those practicing kindness, their acts are planned and intentional.

If you want something to happen, you must be conscious about it and make plans.  That’s why celebrating World Kindness Day is a great way to build the kindness habit. 

How Did World Kindness Day Get Started?

On November 13, 1997, a group of humanitarians came together and decided it was time for a change.  They marked their decision with a “Declaration of Kindness.”  Their purpose became “spreading joy, happiness, and peace by being considerate, compassionate and empathetic towards people and living beings.” 

If you wrote your own Declaration of Kindness, what would you put in it?  How would you spread joy, happiness, and peace to the people around you? 

Your students have lots of ideas on how to be kind to each other.  Make a list and write your own class declaration.  Print it out and hang it on the wall.  Take one act each week and focus on practicing it.  Praise students when you catch them being kind. Have them share their stories of what happened when they were kind to someone else.  Talk about how every act of kindness is an investment in a better future for everyone. 

We’d love to see your declaration and hear your stories!

Play the Compliment Game

A compliment is defined by Oxford as “a polite expression of praise or admiration.”  Abraham Lincoln said everyone likes compliments.  Comedy writer Robert Orben said compliments are “verbal sunshine.” Mark Twain said he could “live for two months on a good compliment.” 

A single compliment can affect the rest of someone’s life.

Since compliments are so powerful, children should learn to master them. 

You can play the compliment game in a variety of ways.  Here are a few ground rules:

·         Everyone must compliment someone else.

·         No one should be left out.

·         The compliment should be sincere.

One way to play is to pass a ball.  When someone catches the ball, they must compliment someone.  When they’re done, they pass the ball to someone else.  Play continues until all students are complimented.

You can also hand out blank cards and assign each student another person to compliment.  Write some sample sentences on the board that they can copy if they wish.  Once the cards are filled out, have the writers deliver them.

Here are some balls for your Compliment Game from Champion Sports.

These framed index cards provide the perfect place to write a short, sincere compliment.

Play Empathy Charades

It’s easier to give sincere compliments when you know people well. 

In this game, have each student come to the front of the class and pick a card.  Written on these cards will be feeling words.  The student then acts out the feeling nonverbally until someone guesses the emotion.

The point of this is to help students understand what others are feeling by reading their faces and behavior.  When you can relate, you can connect.


Donate Toys to Kids Who Need Them

Many kids have more toys than they can play with.  If your students have some they’ve outgrown or don’t play with anymore, another child can give that toy a new life.

Set up a box in your classroom to collect gently used toys.  If possible, take a field trip so your students can see the kids’ faces as they receive the toys.  

Want to donate some new toys to kids who need them?  Check out our selection from Melissa and Doug.

How Kindness Makes You Better

Science tells us that kindness creates:

·         Stronger relationships

·         More satisfaction with life

·         Healthy self-esteem

Each act of kindness is an investment in a better life for you, your community, and the world.   What will you do today to make a better tomorrow for the people around you?

Thursday, December 7, 2017

Rudolph Frame


Supplies Needed:
Directions:
  1. Paint your kids hands and press them on white construction paper.
  2. Cut their hand prints out when dry.
  3. Have them paint the wooden frame.
  4. When the wooden frame is dry, glue on bow, eyes, nose and hand antlers.
  5. If you would like, add the child's photo to the frame before sending it home with the parents!


Wednesday, December 21, 2016

Christmas Graham Cracker House


imageimage
Items needed:
  • Graham Crackers
  • Favorite gummy candies (gumdrops, sour patch kids, Swedish fish)
  • Sprinkles
  • Mini m&m’s
  • Marshmallows
  • Teddy Grahams 
  • Melting Chocolate/icing
  • Plates
Each child should get two full-size graham crackers per house. The Graham cracker should be broken into halves, creating 4 pieces for the children to use and create their house.(2 pieces will be for the foundation of the house and the remaining 2 pieces will be for the roof of the house.)
Creating the foundation to the house, Grab your icing/melted chocolate and 2 pieces of the graham cracker. You will want to add your icing/chocolate to the top of each of these. then stack them on top of one another with the frosting facing up on both. (The icing/ melted chocolate will act as the “glue” to keep the house together.)On the top piece of the frosted foundation have the children decorate it. adding one of the sour patch kids or teddy graham to the center( giving the house someone to live in it.)
Next add the roof of the house in an upside down v position. Add icing/melted chocolate to where the top of the roof connects. while you still have the icing/ melted chocolate, add some to both sides of the roof and decorate those with your favorite gummy candy.
Now it’s time to admire your art and better yet eat it!


Wednesday, November 30, 2016

How to make the Grinch grin classroom craft


imageimage

Items needed: red, yellow, green, white & black construction paper, crayons, cotton balls, ribbon, bells, pom-poms, glue, scissors, curling ribbon, glitter, camera

You will want to get a photo of each kid in the class. It can be printed in black & white or in color depending on your resources.

Once you have the photos cut out, glue them to the bottom left hand side of the black construction paper.

Using a white crayon, write the Childs name (if it’s a girl follow her name with - Lou Who, If its a boy follow his name with a –Who Who) add curly cues to make the names more decorative.

Take the red construction paper and cut out a Santa’s hat, its a curved triangle.

With the green construction paper you will be cutting a light bulb shape, keep in mind the children will be adding a smile to the bottom part of this light bulb shape, make sure it’s big enough for the children to write a few sentences on how they would make the Grinch smile.

Using the yellow construction paper cut out two teardrop shapes for the eyes of the Grinch, rounded on one end and pointy on the other end.

Now on white construction paper cut out a big “U” shape for the smile of the Grinch.Have the children write how they would make the Grinch smile or if its for the younger children have them draw a photo.

Once the children have written their sentence or drawn their photos, have them assemble and glue the grinch to the black construction paper, using a black marker have them draw a circle for his nose and color in his eye balls.

Finally, let them loose on all the other decorative items they have at their tables (yarn ,ribbon, glitter, string, pom-poms and anything else you can think of craft wise to add) have them glue these items to the top of their heads to create fun hairstyles just like the Who’s had in the book.

Tuesday, November 29, 2016

Santa Plate for the Classroom

image

It’s beginning to look a lot like Christmas, It’s time to DECK THE HALLS and walls and windows of your classrooms and FALALALALA with the children as they create the man of the Month SANTA!

what you will need for this project: white paper plate, skin tone colored Crayola markers or Crayola paint, Wiggle eyes, pom-pom balls, red construction paper, glue and lots of cotton balls.

Flip your plate over so that the bottom of the plate is facing up.

Using either the markers or paint have the children color/paint the center of the plate.

Using the red construction paper have the children or yourself cut a triangle with the right side of the triangle curving inwards to create Santas hat.

Grab some glue  and at the top of the colored circle, glue Santa’s hat centered with the right side curving to the left.

Grab two wiggle eyes and one red pom-pom ball and glue the eyes 2” from the bottom of the hat. You will want to make sure there is enough room to add cotton balls to the bottom of the hat without them covering the eyes.

Next it’s time to add the pom-pom ball as Santa’s nose, glue it below the eyes, but keeping it in between the eyes.

Now that it’s time to add all the cotton balls to create Santa’s famous Beard!

First you will want to finish the hat, grab five cotton balls, four will go on the bottom of the hat above the eyes, and your fifth cotton ball will go at the point of the hat at the top. This concludes the hat.

Now for Santa’s beard, you can use two techniques for this part, 1.you can do two circles one around the outside of the center circle of the plate and one on the center of the rippled trim of the plate. 2. the children can do dots where they want the cotton balls to go.

Once you figure which technique will work better for your time frame and or class, have the children add their cotton balls to the glue to finish off the beard.

You better watch out, you better not cry ‘cuz SANTA CLAUS IS COMING TO TOWN!! Well in this case… THE CLASSROOM! Smile

Monday, October 10, 2016

Halloween Treat Bags

image

What you will need: gloves,assorted halloween candy, Ribbon or yarn, Spider ring

Quick and simple treat for kids to enjoy in the classroom!

Step one: Fill the glove with your candy of choice

Step two: Tie your ribbon or yarn

Step three: Add a spider ring to one of the filled fingers for decoration

WALA!! You have a halloween treat bag every child in your class will enjoy!

Thursday, December 17, 2015

Christmas Cookies

 This adorable melting snowman is the perfect cookie for a delicious treat and a good laugh. With the cookie of your choice, take some white frosting and spread it across the top. You can also try melting the icing in the microwave and pouring it onto the cookie. This will give the illusion that your snowman is melting. Next, add on a marshmallow to be the snowman’s head. Lastly, add on your snowman’s features with icing or food pens.

Reindeer Cookies are just as simple to make! Again, using the cookie of your choice, create your base. You will want your cookies to have a bit of an oval shape so you may need to have a cookie cutter handy. While the cookies are still a bit warm, add on two pretzels for the antlers and three m&ms for the eyes and nose. This is a great one for the kids to help with decorating! If you have trouble getting the features to stick, try using a bit of icing to hold things in place!

PureFUN! Supply wishes you a very Merry Christmas and Happy New Year! Meet us back here for our first blogs of 2016! 

Thursday, December 10, 2015

Holiday Craft and Gifts Ideas – Holiday Handprints

Handprint Crafts are the perfect choice for all ages in your school, daycare or childcare center! With a little help from a teacher or parent, students can easily recreate these handprint crafts and use them as gifts for the holiday season. Add the following designs onto T-shirts, cards, ornaments and more!

Five little fingers create the perfect five little snowmen! Paint the entire palm of the hand along with the inner side of the fingers white and stamp down firmly to create the base. Finish off the snowmen by painting on their features and whatever accessories you would like them to have.

This adorable Santa handprint is easy to recreate. Start by stamping your handprint onto the top half of your page. Once you have made your handprint, flip the paper around so that the top is now the bottom and your handprint resembles Santa’s beard. (Fingers should point downward.) Next add on Santa’s facial features and of course his hat! Each of these can be painted on. To keep it easy for little ones, give them a circular paint sponge and let them stamp on the features. Lastly, add on a set of wiggle eyes!


Let’s not forget about the Reindeer that pull Santa’s sleigh! Have students make their handprint with their fingers spread apart. The fingers should be pointed downward with the palm towards the top of the base they are printing on. Finish off your reindeer with a set of hooves on the tips of each finger, a red nose on the tip of the thumb, a small tail opposite the thumb, reindeer antlers and an eye.

Thursday, December 3, 2015

Holiday Crafts & Gift Ideas – Reindeer Prints

This Holiday crafted gift idea is sure to leave a print on the hearts of the ones who receive it! With just a few fingerprints you can create an adorable holiday card, bag, hat and more! All you need is brown finger paint or a brown stamp pad, red paint or a red marker, and a black thin tip marker.

clip_image001

Add your fingerprint to whatever white base you will be using. You can add enough prints to represent your family, one for each of Santa’s reindeer, or however many you would like. Try using different fingers to get the different sizes and prints.

Add the antlers, nose and eyes with your thin tip marker once the paint has dried. Lastly, take your red marker or red paint and add on your reindeer’s nose. You can add your favorite holiday greeting, a name or anything else you would like to decorate with underneath to finish things off.

Now you have an adorable gift to give to your loved ones this holiday season! This craft can be modified for all ages in your school or daycare center too!

Be sure to check back in here for more holiday gift ideas, crafts, snacks and more!

Tuesday, November 24, 2015

Thanksgiving Snack Ideas – Turkey Treats


This adorable cupcake makes for a sweet treat for the Thanksgiving holiday! Start with a vanilla iced cupcake. The cake can be whatever flavor you would like. Next add a circle in chocolate icing to create the body of your Turkey.

Tip! Put the icing container into the microwave for 60 seconds and scoop it into a Ziploc bag. Next, cut the corner of the Ziploc bag to create your very own decorating tool. Simply squeeze the icing into a circle and then fill it in.

Next take 5 candy corns and place them with the point towards the middle on the top side of your chocolate circle. For the head, take a yellow M&M and place it on the top center of the chocolate circle. Add a dot of orange icing on top of the M&M to make a beak and finish off by adding two dots for the eyes with a food marker.

Thursday, November 19, 2015

Thanksgiving Snack Ideas – Healthy Treats

Turkey dips are a wonderful choice for adding some healthy options to your thanksgiving food selection. The first option is a ranch dip with a colorful variety of delicious bell peppers. The second gives a similar look using apples and a hummus dip. You could also use a caramel dip if you wanted to sweeten things up and put a healthier option on the desert table.

clip_image001

This tangerine turkey is a bright choice that will have your little ones begging for more. Cut a pear in half and create the feathers with an array of orange and apple slices. Use raisins or dark chocolate for the eyes and a peanut for the beak. Cheese makes for the perfect pair of feet. You can use cheese for the beak too for those with peanut allergies.

The final turkey treat includes the sandwich of your choice cut into the shape of a turkey body. Next, add carrots around for the tail feathers, raisins for the eyes, and a cashew for the beak.  Again, cut some cheese to create the legs and feet. You can even give your Turkey some grass to stand on by cutting up some celery.

Try adding a healthy drink to go along with your snacks with PureFUN! 100% Juice!`

Tuesday, November 3, 2015

Thanksgiving Crafts - Fingerprint Turkey

This fingerprint turkey is the perfect craft for the upcoming Thanksgiving holiday! You will need finger paint in light orange or yellow, orange, red and brown. You will also need a bit of black and white paint as well for the finishing touches.

clip_image001

Lets get started! Begin by dabbing your pointer finger into the light orange or yellow color. Create an arc by printing your finger onto the page about 8-10 times. Next, take the red color and make a smaller arc beneath it using the same technique. Repeat this step once more using the red paint to complete the tail.

If you have gone for the facing forward Turkey, paint your thumb brown and stamp it vertically into the middle to be the body of the turkey. If you have gone for the side view you will want to print your thumb horizontally from the middle and then add a head by printing in brown with your pointer finger vertically.

Don’t forget to add on the finishing touches with eyes, a beak, legs and feet! Now you have an adorable craft for Thanksgiving. Try having your students do this on the front of a blank card. Then have them write to someone they are thankful for and tell them why they are thankful for them.

Wednesday, March 11, 2015

Shamrock Snack

Shamrock Pretzel Pop Steps - Shamrock Pretzel Pops - Pretzels, Rolo Candy & a Green M&M. SO pretty and festive for a St. Patrick's Day Party!

This adorable snack is both festive and easy! Celebrate St. Patrick’s Day with a little Shamrock Snack.

Here’s what you will need: Pretzels, Rolo Candy, Green M&Ms, Lollipop Sticks (optional), Baking Sheet and Pan or Plates

Start by placing 3 pretzels together with the bottoms touching as seen in the 3rd picture. Next, take a Rolo and place it on top. You will want to warm the Rolo a bit so that it can be easily smushed without breaking the pretzel.

Tip! If you do not have access to an oven, try placing them by the window to get a little warmth from the sun. Just keep an eye on them so they don’t melt!

With your Rolo in place, smush a green M&M into it’s center. You can then add the lollipop stick to make it stand up.

You will want to let the Rolos harden after construction. Place them in a refrigerator for faster results. Again, if you are doing this in the classroom, you can place them out of the sunlight and allow the candy to harden.

Now you have a sweet, Shamrock Snack to hand out to your students, or even help them create in class!

Thursday, December 4, 2014

Healthy Holiday Snacks: Christmas

Holiday snacks are always fun for little ones to eat and create! We want to share with you a few ideas we found that will be perfect snacks for the holidays but also healthy choices for your growing students.
You can prepare the items for your students to make each snack or have them ready to go for them depending on time and age of your students.

Christmas Tree


Items needed: Celery, Carrots, Sliced Meat, Pineapple, Plates
Begin by forming your tree. To create the Christmas Tree shape we are going to zigzag our celery. Next take your choice of sliced meat (ham, turkey, bologna) and fold it to represent the trunk. Lastly, you will need sliced carrots to place around the tree for the ornaments and a star cut out of pineapple to make the star for the top of the tree.

Candy Cane

Items Needed: Bananas, Strawberries, Peanut Butter or Nutella
This one is super simple but turns out really cute! Go ahead and cut up your bananas and strawberries. Then take your peanut butter or Nutella and spread it onto the plate into a candy cane shape. Then have the students alternate from banana to strawberry to make the candy cane. This is the perfect snack for practicing patterns!

Santa


Items Needed: Bananas, Large Marshmallows, Mini Marshmallows, Strawberries, Dark Chocolate, Red M&Ms, Peanut Butter or Nutella (optional)
You will need to do a little prep for this one. Grab your knife and cut the large marshmallow in half. Then you will need to cut the banana into slices and cut the bottom off the strawberry to make it resemble a triangle shape. You can use your Peanut Butter, Nutella, or even your dark chocolate here to stick your base together. From bottom to top, it should stack marshmallow, banana, marshmallow then strawberry. Now to add the finishing touches take your dark chocolate and add the eyes and “glue” for the nose and hat topper. Next you can stick on your red M&M for the nose and mini marshmallow on top of the hat.

You of course need a healthy drink to go with your healthy holiday snacks! Be sure to check out our 100% Juice. Choose from 22 delicious flavors that you and your little ones will love. We even have a selection of colored choices to go with the holiday spirit.

Friday, November 21, 2014

Healthy Holiday Snacks: Thanksgiving

We wanted to kick off this Holiday Snack series with some festive healthy choices. First off is a healthy Turkey themed snack that is perfect for celebrating Thanksgiving with your little ones.

Items Needed: Pear, Strawberries, Grapes, Cheese, Dark Chocolate

Begin by cutting your pear in half and placing it flat side down on the plate. This will be the body of your Turkey. Next you can place cut up strawberries, bananas and grapes around the top of the pear to represent the tail feathers. Try having your students create different patterns in their tail.

Lastly cut the beak and feet out of a piece of cheese and add the eyes with a little dark chocolate. Now you have an adorable turkey snack that is perfectly healthy.

For more Holiday Snack ideas, check back in with us.

Friday, October 31, 2014

Toilet Paper Roll Crafts: Christmas

Christmas Themed
Toilet Paper Roll Christmas Trees – These festive, little Christmas Trees make for the perfect Christmas decor. They can even be used as ornaments. Cut the roll at an angle making a continuous swirl down from top to bottom. You can make the distance between the cut thin like the first picture, or thick like the second. We have found that it is easier to paint the roll green after cutting so you have easier access to the inside portion. You can add glitter, jewels or stickers to personalize your tree.  Don’t forget the star for the top!
  
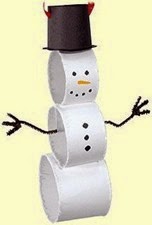
Toilet Paper Roll Snowman – There are two options for this adorable snowman. For the first option, cut the roll into three rings. You will need to have a small, medium and large in width. Next, paint it white on the outside and inside. Once dry, you can add on chenille stem arms and draw on the eyes, nose, mouth and buttons. Lastly, cut a circle and rectangle out of black construction paper. Use the rectangle to create a fourth ring and glue it onto the circle to form the hat. Now you have a triple stacked snowman that makes for a cute ornament!
clip_image00112_thumb2   clip_image00114_thumb2
Option two is perfect for little ones. Paint your roll white. When dry, draw on the eyes, nose, mouth and buttons. To keep it simple, you can also draw on the scarf and hat or cut them out of construction paper to give a different look.
Toilet Paper Roll Santa – This Santa is quite similar to the second snowman pictured above. Paint 1/4th of the roll white or peach, and the rest red. When dry, take a cotton ball and use it to form Santa’s beard. You may need to manipulate it a little by pulling it apart to give it more of a real beard look. After gluing on the beard you can add on his eyes and nose. Try using wiggle eyes for a different look! For Santa’s hat, just cut a triangle out of red construction paper. Take a small piece of the cotton ball to make the little ball for the top of the hat and you're done.
Toilet Paper Roll Reindeer – You can leave your toilet paper roll in its original color for this one or paint it a different color brown. To create Rudolph’s legs just cut out four rectangles on the front, back and each side of one end. Now you can add on a ball for his nose, wiggle eyes, and form him some antlers out of chenille stems. Don’t forget to give your reindeer a smile to spread the Christmas joy with.
clip_image00116_thumb2

Wednesday, October 29, 2014

Toilet Paper Roll Crafts: Thanksgiving

Thanksgiving Themed

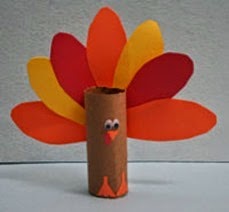
Toilet Paper Roll Turkey – We cant get enough of these adorable turkeys! Use the roll as your base and add on the eyes, beak, feathers and feet. You can use wiggle eyes, chenille stems for feet, and actual feathers like the second turkey or keep things simple by drawing everything on like the first. Try using the construction paper feathers and have students write what they are thankful for on them!

clip_image0018_thumb2   clip_image0025_thumb1

Toilet Paper Roll Pilgrim Hat – This easy to make hat makes for the perfect center piece or place cards to show your guests where their seats are. Using construction paper, cover your roll in black. Then trace the end of your roll to give you the circle that covers the top of the hat. The bottom brim is just another circle but you want it to be larger than the first. Glue the circles in place and add the yellow square detailing to create the perfect pilgrim hat.

image    image

Friday, October 17, 2014

Toilet Paper Roll Crafts: Halloween

Toilet paper rolls make for the perfect recycled crafts! We want to help you prepare for the upcoming holidays with a few of our favorite Holiday Toilet Paper Roll Crafts. From Halloween to Christmas, here are a few ideas to decorate your classroom or to send home with your students to decorate their homes.

For starters, you will need to collect your toilet paper rolls. These are great to have on hand for art projects throughout the year too. Try storing them away as you use them up.

Next you will want to grab all your art supplies. This could mean using paint, markers, stickers, glue, scissors, and more!

Halloween Themed

Toilet Paper Roll Pumpkins – There are two different pumpkins that we chose. One is very simple and the other a little more challenging. Just paint or color with marker or crayon to get an orange roll. For the first, draw on a face and add leaves to the top. For the second, cut the roll into multiple rings. Glue or tie them together in the middle to create a pumpkin shape. The stem is simply a ring of toilet paper roll painted green with two strips cut on the bottom to create a vine effect.

clip_image001   clip_image001[4]

Toilet Paper Roll Bats – This is as simple as it looks. Paint or color your roll black. When dry, fold down the top end on both sides to create the bat ear look. Wings can be cut out of black construction paper while you wait for the paint to dry. Add on the wings and a set of wiggle eyes and you're all finished!

Toilet Paper Roll Mummies – These mummies make for the perfect Halloween decorations. You can use a little left over toilet paper, thin streamers, white gauze, or tissue paper to cover the toilet paper roll and give it a mummy look. To get the first option simply add on some wiggle eyes. The second one makes this craft even cuter by making it more personal! Just cut out a picture of each students face and put it on the roll before wrapping. Now they are the mummies!

    image

Check back in at http://purefunsupply.blogspot.com for more holiday themed Toilet Paper Roll Crafts.

Thursday, April 17, 2014

Plastic Easter Eggs Game Ideas


Easter is quickly approaching and students are in need of some new learning games and activities as the year draws to an end. We have some quick and easy ideas to share with you that are sure to be “egg-cellent” for your students!

clip_image001

Kids love those colorful, plastic Easter eggs and now teachers will too! They are a fun and inexpensive way to create games and learning activities for the spring season! You will need the eggs that can be opened and split completely in half. Any size, color, and even shape would be great for these activities. You can find the eggs at any local grocery store around Easter time for a low price.

clip_image003Our first egg activity is perfect for little ones who are learning their colors! Begin by taking as many eggs as you would like and splitting them in two. Eggs can be placed on the floor, on a table or on any flat surface. We suggest placing them on the floor if you are going to have a large group working at the same time and a table for smaller groups or individual work. Mix up the halves until there is a good mix of colors. Now have your students rematch up the eggs to their missing half. You could also have students separate the full eggs by color into baskets or trays or on top of a piece of matching colored construction paper after finding their missing pieces.

Another fun idea for the little ones is an alphabet matching game with upper case and lower case letters. Simply add the uppercase letter on one half of the egg and the lower case on the other half. Students will then need to match up the letters to give each egg one upper case half and one lower case half of each letter. Letters can be added in permanent marker or with alphabet stickers.

clip_image004

Not challenging enough for your class? Here are a few ideas to take it to the next level!

Write different words that can be formed into contractions onto each egg half. For example, “can” on one half and “not” on the other. Place the contraction inside on a piece of paper. When they open their egg they find the answer, “can’t”.

The same concept can be used for math problems as well. Put a number on each egg half and have students add, subtract, multiply or divide the numbers. You can match these up ahead of time and provide the answer inside for them or just let students match up the numbers and egg colors to create different problems to solve.

Try out one of these Egg Games and let us know what you think! Your students should be “egg-static” about the new classroom games!

Thursday, December 5, 2013

Decorating for the Holidays

clip_image002

Christmas is quickly approaching and the decorating has begun. No kid can resist the reds and greens of the Christmas season! Get them excited for the holidays with one of our Christmas Bulletin Board Sets. Whether you want to create a winter wonderland, complete with snowflakes and snowmen, or you want to show your kids the joy of Christmas with the Peanuts gang, we have a set for you! Our wide selection of Bulletin Board Sets contains a perfect set for every classroom!

Help put your students in the holiday spirit this winter with these holiday decorations.

Be sure to share your classroom decorating with us on the PureFUN! Facebook page. While you’re there, like us for all PureFUN! updates and follow us on Pinterest for more great classroom decorating ideas.

www.purefunsupply.com