Wednesday, March 11, 2015

Shamrock Snack

Shamrock Pretzel Pop Steps - Shamrock Pretzel Pops - Pretzels, Rolo Candy & a Green M&M. SO pretty and festive for a St. Patrick's Day Party!

This adorable snack is both festive and easy! Celebrate St. Patrick’s Day with a little Shamrock Snack.

Here’s what you will need: Pretzels, Rolo Candy, Green M&Ms, Lollipop Sticks (optional), Baking Sheet and Pan or Plates

Start by placing 3 pretzels together with the bottoms touching as seen in the 3rd picture. Next, take a Rolo and place it on top. You will want to warm the Rolo a bit so that it can be easily smushed without breaking the pretzel.

Tip! If you do not have access to an oven, try placing them by the window to get a little warmth from the sun. Just keep an eye on them so they don’t melt!

With your Rolo in place, smush a green M&M into it’s center. You can then add the lollipop stick to make it stand up.

You will want to let the Rolos harden after construction. Place them in a refrigerator for faster results. Again, if you are doing this in the classroom, you can place them out of the sunlight and allow the candy to harden.

Now you have a sweet, Shamrock Snack to hand out to your students, or even help them create in class!

Thursday, March 5, 2015

Sickness Prevention

It can be challenging to keep your little ones from catching the illnesses that spread easily in classroom settings. This is especially true in the cold weather months! We want to help you avoid those sick days at home with a few of our favorite tips and tricks that will help keep you and your students germ free and healthy!

Image result for sickness prevention in the classroom

1. Wash your hands. This is a simple step but often a missed one. Washing your hands thoroughly and often will help you to decrease the amount of germs that you will encounter during the day. It is important that you remind your students to wash their hands more often and show them how to do it correctly. You can even provide a hand sanitizer for quick germ prevention throughout the day.

2. Sanitize your classroom. The more often you can do this, the better. This can mean cleaning your tables, toys, diaper changing stations and more. Sanitizer Wipes or Sprays are perfect for a quick clean up. We suggest making this a weekly event to ensure a clean classroom environment.

3. Build immunity. It is important to have an overall healthy lifestyle to help fight sicknesses and ultimately prevent them. By eating healthy, exercising regularly and getting enough sleep, you can build your body’s immunity. This will give your body the extra strength it needs to fight the germs that you encounter every day.

Have a sickness prevention tip that works well in your classroom? We would love to hear from you! Just leave us a comment down below.

Wednesday, January 28, 2015

How To Motivate Students to do their Best Work in 2015

Looking for ways to get the best work out of your students in 2015? Here are a few things you can do to motivate them to give their best effort.

Set Goals- Goal Setting is a great motivator for students of all ages. Each individual student should have goals to reach that meet their specific learning abilities. You can even make class goals! To make this even more effective, you can make a goal sheet so that the goals become visual to the students. They will enjoy seeing themselves climb to new heights and reach each goal along the way. Incentive pads are a great way to inspire and track progress as well!

Show Enthusiasm!- Your Students will be inspired by your excitement. By showing enthusiasm, students will feed off of your attitude and mimic your excitement. You can also get them excited about learning by making things fun! Turn the activity into a game or an art project. You can even allow students to work together as a team. They will then be inspired by one another to do their best!

Expect Their Best Work- Let students know that you are aware of their potential and that you want to see their very best effort. You can create a positive competition by having children compete with their best record or best score. Make sure that you allow a chance for improvement when they fall short. You can give them feedback that will encourage their best work and help them to obtain it. Be careful not to discourage and always keep it positive!

Give Praise- When students give their best work, let them know! Be specific when telling them what you like or when you see improvement. Make sure to give praise when effort is being made. This will inspire students to continue in their work and not give up on it.

Reward Good Work- Students love to be rewarded for their hard work. This can be achieved in several ways. You can give prizes like stickers, badges and awards or hang good work on the wall for all to see. Maybe they get to go to the treasure box or even attend a special pizza party during snack time. They will love earning prizes and bringing things home to show Mom and Dad.

Thursday, December 4, 2014

Healthy Holiday Snacks: Christmas

Holiday snacks are always fun for little ones to eat and create! We want to share with you a few ideas we found that will be perfect snacks for the holidays but also healthy choices for your growing students.
You can prepare the items for your students to make each snack or have them ready to go for them depending on time and age of your students.

Christmas Tree


Items needed: Celery, Carrots, Sliced Meat, Pineapple, Plates
Begin by forming your tree. To create the Christmas Tree shape we are going to zigzag our celery. Next take your choice of sliced meat (ham, turkey, bologna) and fold it to represent the trunk. Lastly, you will need sliced carrots to place around the tree for the ornaments and a star cut out of pineapple to make the star for the top of the tree.

Candy Cane

Items Needed: Bananas, Strawberries, Peanut Butter or Nutella
This one is super simple but turns out really cute! Go ahead and cut up your bananas and strawberries. Then take your peanut butter or Nutella and spread it onto the plate into a candy cane shape. Then have the students alternate from banana to strawberry to make the candy cane. This is the perfect snack for practicing patterns!

Santa


Items Needed: Bananas, Large Marshmallows, Mini Marshmallows, Strawberries, Dark Chocolate, Red M&Ms, Peanut Butter or Nutella (optional)
You will need to do a little prep for this one. Grab your knife and cut the large marshmallow in half. Then you will need to cut the banana into slices and cut the bottom off the strawberry to make it resemble a triangle shape. You can use your Peanut Butter, Nutella, or even your dark chocolate here to stick your base together. From bottom to top, it should stack marshmallow, banana, marshmallow then strawberry. Now to add the finishing touches take your dark chocolate and add the eyes and “glue” for the nose and hat topper. Next you can stick on your red M&M for the nose and mini marshmallow on top of the hat.

You of course need a healthy drink to go with your healthy holiday snacks! Be sure to check out our 100% Juice. Choose from 22 delicious flavors that you and your little ones will love. We even have a selection of colored choices to go with the holiday spirit.

Friday, November 21, 2014

Healthy Holiday Snacks: Thanksgiving

We wanted to kick off this Holiday Snack series with some festive healthy choices. First off is a healthy Turkey themed snack that is perfect for celebrating Thanksgiving with your little ones.

Items Needed: Pear, Strawberries, Grapes, Cheese, Dark Chocolate

Begin by cutting your pear in half and placing it flat side down on the plate. This will be the body of your Turkey. Next you can place cut up strawberries, bananas and grapes around the top of the pear to represent the tail feathers. Try having your students create different patterns in their tail.

Lastly cut the beak and feet out of a piece of cheese and add the eyes with a little dark chocolate. Now you have an adorable turkey snack that is perfectly healthy.

For more Holiday Snack ideas, check back in with us.

Friday, October 31, 2014

Toilet Paper Roll Crafts: Christmas

Christmas Themed
Toilet Paper Roll Christmas Trees – These festive, little Christmas Trees make for the perfect Christmas decor. They can even be used as ornaments. Cut the roll at an angle making a continuous swirl down from top to bottom. You can make the distance between the cut thin like the first picture, or thick like the second. We have found that it is easier to paint the roll green after cutting so you have easier access to the inside portion. You can add glitter, jewels or stickers to personalize your tree.  Don’t forget the star for the top!
  
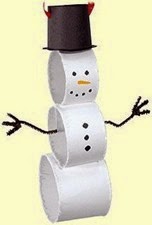
Toilet Paper Roll Snowman – There are two options for this adorable snowman. For the first option, cut the roll into three rings. You will need to have a small, medium and large in width. Next, paint it white on the outside and inside. Once dry, you can add on chenille stem arms and draw on the eyes, nose, mouth and buttons. Lastly, cut a circle and rectangle out of black construction paper. Use the rectangle to create a fourth ring and glue it onto the circle to form the hat. Now you have a triple stacked snowman that makes for a cute ornament!
clip_image00112_thumb2   clip_image00114_thumb2
Option two is perfect for little ones. Paint your roll white. When dry, draw on the eyes, nose, mouth and buttons. To keep it simple, you can also draw on the scarf and hat or cut them out of construction paper to give a different look.
Toilet Paper Roll Santa – This Santa is quite similar to the second snowman pictured above. Paint 1/4th of the roll white or peach, and the rest red. When dry, take a cotton ball and use it to form Santa’s beard. You may need to manipulate it a little by pulling it apart to give it more of a real beard look. After gluing on the beard you can add on his eyes and nose. Try using wiggle eyes for a different look! For Santa’s hat, just cut a triangle out of red construction paper. Take a small piece of the cotton ball to make the little ball for the top of the hat and you're done.
Toilet Paper Roll Reindeer – You can leave your toilet paper roll in its original color for this one or paint it a different color brown. To create Rudolph’s legs just cut out four rectangles on the front, back and each side of one end. Now you can add on a ball for his nose, wiggle eyes, and form him some antlers out of chenille stems. Don’t forget to give your reindeer a smile to spread the Christmas joy with.
clip_image00116_thumb2

Wednesday, October 29, 2014

Toilet Paper Roll Crafts: Thanksgiving

Thanksgiving Themed

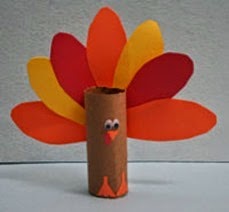
Toilet Paper Roll Turkey – We cant get enough of these adorable turkeys! Use the roll as your base and add on the eyes, beak, feathers and feet. You can use wiggle eyes, chenille stems for feet, and actual feathers like the second turkey or keep things simple by drawing everything on like the first. Try using the construction paper feathers and have students write what they are thankful for on them!

clip_image0018_thumb2   clip_image0025_thumb1

Toilet Paper Roll Pilgrim Hat – This easy to make hat makes for the perfect center piece or place cards to show your guests where their seats are. Using construction paper, cover your roll in black. Then trace the end of your roll to give you the circle that covers the top of the hat. The bottom brim is just another circle but you want it to be larger than the first. Glue the circles in place and add the yellow square detailing to create the perfect pilgrim hat.

image    image

Friday, October 17, 2014

Toilet Paper Roll Crafts: Halloween

Toilet paper rolls make for the perfect recycled crafts! We want to help you prepare for the upcoming holidays with a few of our favorite Holiday Toilet Paper Roll Crafts. From Halloween to Christmas, here are a few ideas to decorate your classroom or to send home with your students to decorate their homes.

For starters, you will need to collect your toilet paper rolls. These are great to have on hand for art projects throughout the year too. Try storing them away as you use them up.

Next you will want to grab all your art supplies. This could mean using paint, markers, stickers, glue, scissors, and more!

Halloween Themed

Toilet Paper Roll Pumpkins – There are two different pumpkins that we chose. One is very simple and the other a little more challenging. Just paint or color with marker or crayon to get an orange roll. For the first, draw on a face and add leaves to the top. For the second, cut the roll into multiple rings. Glue or tie them together in the middle to create a pumpkin shape. The stem is simply a ring of toilet paper roll painted green with two strips cut on the bottom to create a vine effect.

clip_image001   clip_image001[4]

Toilet Paper Roll Bats – This is as simple as it looks. Paint or color your roll black. When dry, fold down the top end on both sides to create the bat ear look. Wings can be cut out of black construction paper while you wait for the paint to dry. Add on the wings and a set of wiggle eyes and you're all finished!

Toilet Paper Roll Mummies – These mummies make for the perfect Halloween decorations. You can use a little left over toilet paper, thin streamers, white gauze, or tissue paper to cover the toilet paper roll and give it a mummy look. To get the first option simply add on some wiggle eyes. The second one makes this craft even cuter by making it more personal! Just cut out a picture of each students face and put it on the roll before wrapping. Now they are the mummies!

    image

Check back in at http://purefunsupply.blogspot.com for more holiday themed Toilet Paper Roll Crafts.

Thursday, October 16, 2014

Shoe Covers

Need help keeping floors clean or keeping your nursery germ free? Try out our Disposable Shoe Covers! Made from 100% spun-bond polypropylene, our shoe covers are both durable and economical. The traction grip soles provide skid resistance to prevent slips while the gentle, elastic ankle keeps the shoe cover in place.

Unisize Shoe Covers

Shoe Covers are perfect for protecting shoes from dust, spills and splashes. They will also protect your floors from tracked in grime. Try out these Shoe Covers today and help protect your daycare or childcare center from dirt and germs.

Each case includes 300 Shoe Covers. The Universal Size fits up to a men’s 10.5 and the Extra Large fits men’s sizes 10.5 and larger.

Wednesday, October 8, 2014

Coffee Filter Crafts

Did you know that Coffee Filters are the perfect base for Halloween themed crafts? Here is a list of spooky craft ideas to help you decorate your classroom.

Coffee Filter Ghosts

The coffee filter ghost is just as simple as it looks. Simply flip the coffee filter upside down and place a string through the center. Don’t forget to draw on the eyes and mouth! Wiggle eyes would even look great on these fun hanging ghosts. Try using a clear string to make them look like they're actually floating!

To make the coffee filter rounded on top verses pointed, add a ball of paper or aluminum foil to the end of the string.

Coffee Filter Pumpkins

You can use water colors or washable markers to make the coffee filter orange.


This first option is perfect for little ones. Just add the stem and leaf and you have a cute little pumpkin. Try placing these on the windows to get a fun glow when the sun shines through them.

This pumpkin is a little more challenging. Place a ball of paper or tin foil in the center of the coffee filter and tie it off with string or tape. You can add a face on with felt or with markers. Easily include a stem by placing a small stick in the center.

Coffee Filters Leaves

Leaves are perfect for the fall season! Have your students color their coffee filters with washable markers. When they are finished, spray them with a spray bottle of water to give them a fun, airbrushed effect. When dry, trace different leaf shapes and cut them out. These add a great splash of colors to any classroom!

Coffee Filter Bats

These guys are fun and easy to create. Start by coloring the coffee filter using markers or water colors. When dry, cut ridges around the outer edge to give the waved effect pictured above. Then add a clothes pin in the middle to create the body of the bat along with some wiggle eyes to complete the look.

Coffee Filter Spider Webs

These spider webs are made just like paper snowflakes. By folding up the coffee filter and cutting rectangles into it you can easily create this shape. Be sure to leave a strip uncut on one side to keep the sides connected.

Monday, September 29, 2014

Classroom Management – Play Ball!

A great way to keep students in check is to have a tangible scoring system of their behavior. Here is one of our favorites called Classroom Baseball.

Classroom Baseball is a great choice for any classroom. Start by creating a poster that includes a pocket for each student. Each pocket will have three craft sticks in it to represent strikes. Throughout the day, you can give students that are misbehaving a strike. That student will then need to remove one of their sticks from their pocket. Those who strike out get a note or phone call home to Mom or Dad. Students who complete the day, or even the week, without any strikes will get the chance to “play ball’.


You will need to reserve just a few minutes at the end of the day, or the end of the week, for this portion. The well behaved students can line up for a chance to toss the ball for a prize. You can simply use a ball or a bean bag and a small trash can or even have four different boxes to represent the bases.

Tip! Try using four different sized boxes or baskets. They will get smaller as the bases go on making first base the largest and home plate the smallest. The prizes will be better when they choose a more challenging base.

Now you have a fun game for students to look forward to. It will give them incentive to be on their best behavior each day and not strike out. Now let’s play ball!

Friday, September 26, 2014

Classroom Management – Take a Brain Break

We all have those days when the work becomes too much or we just can’t quite seem to keep still. The perfect solution is to take a quick Brain Break. Give your students a few minutes to get their wiggles out and focus on something different.

You can use this time to sing a song, take a walk outside or around your hallway, play a quick game, or even have a little snack. Taking this time will help you to avoid outbursts from antsy students and frustration for those who just need a brain break.


Try this! Have students write their favorite Brain Break activity on a craft stick. Put the sticks in a cup and draw one when it is time for a Brain Break. Your students will love seeing what their surprise Brain Break will be.


Want more classroom management ideas? Check back in at http://purefunsupply.blogspot.com.

Thursday, September 25, 2014

Classroom Management – Rules and Goals

A great way to get students involved in creating your classroom management plan is to have them help you decide what the rules and goals of your classroom should be. Have students spend some time brain storming ideas and write them on the board as they come up with them. They can also create consequences and rewards for when goals are met and rules are broken.

clip_image001

Once completed create a visual to hang in the room. This might be one poster with everything on it, one poster for rules and consequences and one for goals and rewards, or even a poster for each rule and each goal. Have your students split into groups to create and decorate the posters or allow them to decorate the one large poster with everything on it.

clip_image003       clip_image005

Now students are guaranteed to know what the rules are since they helped to create them! This gives them a visual reminder of each rule and what happens when they disobey them. They also have a positive visual of goals and what rewards they will receive when goals are met.

Check out our Incentives and Motivators to use as rewards for good work and good behavior!

Wednesday, September 24, 2014

Classroom Management

For every teacher, having a solid Classroom Management Plan is key! Sadly, there isn’t one magic plan that works for every classroom or student, but by sharing a few ideas we hope to help you create a plan that works for your classroom! In this series, you will find a few basic tips and ideas that will help you keep a positive and manageable environment for your students.

clip_image002

Our first tip is simple; Love your students. There is typically a student in every classroom that stirs up a bit of trouble. This can cause tension in the room and even between teacher and student. The difference in positive reinforcement and a negative reaction is loving each student first. Think of them as your own and strive to make sure they know they are loved and believed in while in your classroom. Look for the best in each student and help them to always bring their best to class with them every day. By letting them know you believe in their best you are encouraging them to believe in their best as well.

clip_image003

Along those same lines, tip two is to Set the Tone of your Classroom. Leave room for humor and take the time to recognize the personalities of your students. It really makes a difference for you and for them when you remove pressure and get to know them. Your classroom should be a positive environment for every student. Having a reminder to keep things positive may be beneficial to your room. Try adding a poster with a positive quote to keep students inspired!

Looking for more tips and ideas on classroom management? Check back in at http://purefunsupply.blogspot.com/ tomorrow for another blog post. You can also leave us a comment below and let us know what works best in your classroom! We would love to share it in one of our future posts.