Wednesday, October 25, 2017

Fall Luminaries


These paper bag fall luminaries are a quick an easy way to add a little bit of autumn magic to your home or to a classroom.


What you will need:


Directions:

1.Carefully poke a hole in the front of your paper bag and cut a large rectangle out of it. Make sure to leave a little bit of an edge all around your rectangle.


2.Cut a piece of wax paper just a bit larger than the hole that you cut out of the paper bag. Draw a tree trunk with a Black Sharpie.

3. Flip the wax paper over once you have finished your drawing. Squeeze and spread school glue on the wax paper where leaves would be. Tear up pieces of fall colored tissue paper and press the pieces on the glue.


4.Use more glue if needed and overlap with more pieces of tissue.


5.Tear up different colored tissue for the backdrop. Spread out more glue around the tissue leaves and press the backdrop color around the leaves and fill up the rest of the wax paper. Let the tissue paper dry and then trim any excess tissue that is hanging over the edge of the square of wax paper.


6.Tape the wax paper over the hole in the paper bag


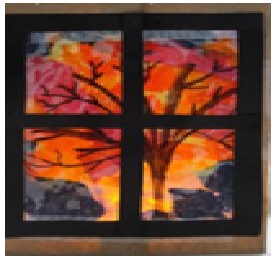
7.Cut long thin strips of black construction paper to form your window. Glue 4 strips around your picture to frame it and then glue 2 more strips in a cross through the middle.


8.Open up the bag and place a flameless tealight inside and watch it glow!


Monday, October 9, 2017

World Smile Day


In honor of World Smile Day, we have found our two favorite activities to help encourage the kids to smile, laugh and be active. The first activity is a fun way to get kids outdoors, take them for a nature walk around the school. Have them enjoy the beautiful October weather.


Nature Faces


Supplies for Nature Faces:
  • Various natural materials such as: Leaves, flowers, moss, grass, rocks, pine cones, acorns.
  • Sidewalk chalk
    Instructions for nature Faces:

  • Gather natural material , have the children choose all kinds of different items
  • On the nature walk have them draw circles and create funny faces with the natural materials they find.
     
     Our Second Activity is a fun one for kids to do indoors on those chillier days or rainy days. Smile Grams are a creative way to show some kindness around the classroom.


Smile Grams


Instructions on Creating Smile Grams:
 
  • Take a picture of each child with their biggest smile.
  • Enlarge the picture and cut out only the Childs smile.
  • Using red construction paper cut out red lips.
  • Glue the smiles to the red lips.
  • Have the children decorate the lips with stickers and glitter.
  • Have the children write a special note on the back of the lips but don’t have them sign their name. 
  • Put the smile, the smile gram and a couple of poems in an envelope and have the children turn their mail into you and you can disperse the envelopes around the classroom, in Friday folders or cubbies.
     
     
    Here is a poem to include:
     
    Smiling Is Infectious
    Author Unknown
     
    Smiling is infectious,
    you catch it like the flu,
    When someone smiled at me today,
    I started smiling too.
    I passed around the corner
    and someone saw my grin.
    When he smiled I realized
    I'd passed it on to him.
    I thought about that smile,
    then I realized its worth.
    A single smile, just like mine
    could travel round the earth.
    So, if you feel a smile begin,
    don't leave it undetected.
    Let's start an epidemic quick,
    and get the world infected!
                                    
    Special note:
    Please pass this along
    It’s the Random Act of Kindness way!