Wednesday, November 14, 2018

10 Best Christmas Crafts for Kids

Christmas Crafts for Kids: Edible and Decorative Activities for your Classroom


Looking for creative new Christmas crafts to engage your class? Tired of doing the same activities year after year? This collection of our ten best Christmas activities for kids will provide hours of fun festivities for your little ones. Below you will find 5 decorative & 5 edible craft ideas! Edible crafts make delicious holiday snacks, while decorative crafts make festive decorations for your classroom or Christmas gifts to take home to mom and dad!

Top 5 Decorative Christmas Craft Ideas: 


1. Rudolph Frame


http://purefunsupply.blogspot.com/2017/12/rudolph-frame.html

Of course everyone's favorite reindeer deserves a spot on your Christmas craft list! Put a class photo inside to complete this cute take-home craft!

http://purefunsupply.blogspot.com/2017/12/pom-pom-ornaments.html

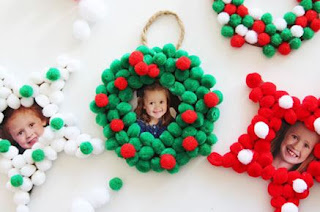
Decorate your classroom or school tree with these colorful Christmas ornaments, personalized with the picture of the child artist who made them!


3.  Holiday Hand Prints


http://purefunsupply.blogspot.com/2015/12/holiday-craft-and-gifts-ideas-holiday.html

 Put a fun holiday spin on traditional hand prints with this easy craft for kids of all ages!  We'll show you how to make reindeer, snowmen, or Santa Claus! Use these to decorate the front of handmade Christmas cards, t-shirts, or bulletin board and hanging decorations.


4.  Reindeer Prints


http://purefunsupply.blogspot.com/2015/12/holiday-crafts-gift-ideas.html

A similar Christmas craft is this adorable reindeer fingerprint design, easily modified for kids of all ages and decorations of all sizes!


5. Christmas Tree Plate


http://purefunsupply.blogspot.com/2016/12/christmas-tree-plate.html


Make this gem of a Christmas tree sparkle and shine with glitter, stickers, beads, and any other "ornaments" you may find!


Top 5 Edible Christmas Craft Ideas:


1. Christmas Graham Cracker House


http://purefunsupply.blogspot.com/2016/12/christmas-graham-cracker-house.html

Forget the gingerbread house! Hansel and Gretel would agree, this graham cracker house is sweet enough to eat! Check out our CACFP-approved graham cracker bears! For more CACFP-approved goodies, check out our full listing here!


2. Peanut Butter Pretzel Reindeer


http://purefunsupply.blogspot.com/2016/12/reindeer-treats-for-classroom.html

Another neat graham cracker treat is this friendly Rudolph snack! For an allergen-friendly treat, use any type of seed butter or peanut butter alternative and gluten-free pretzels.


3. Strawberry Banana Candy Cane


http://purefunsupply.blogspot.com/2014/12/healthy-holiday-snacks-christmas.html


Simple, sweet, and healthy to eat, this candy cane won't hang around for long!


4. Strawberry Banana Santa Claus


http://purefunsupply.blogspot.com/2014/12/healthy-holiday-snacks-christmas.html

Don't miss putting these precious mini Santa's on your Christmas snack list this year!


5. Celery Celebration Tree


http://purefunsupply.blogspot.com/2014/12/healthy-holiday-snacks-christmas.html


Trim this tree with any assortment of veggies for a very merry healthy holiday snack!


We love Christmas and Holiday craft ideas here at PureFUN! Supply! They keep us smiling! We would love to see your students creations! Like us on Facebook and post a picture of your students with their work!
Also, comment below and tell us which craft you will try this December!


Friday, November 2, 2018

Fun Fall Crafts for Kids


While the weather gets colder, stay warm and cozy with these fantastic indoor crafts in fabulous fall colors. Try these with your class or with your kids at home over Thanksgiving break!


Fall Luminaries

Use these warm and inviting luminaries to decorate your classroom or let your students take them home as gifts! This craft will help younger children work on their fine motor skills, while older children will have fun using creativity to make their luminaries more elaborate.

What You Need:
Mason Jars
Mod Podge
Candles (tea candles are the perfect size!)
Wet Wipes (or wet paper towels)

1.Tear your colored tissue paper into small strips. 

2.Cut a tree shape out of brown construction paper. (You can make your tree as simple as the photo above or add more branches, etc.)

3.Using your paintbrush, coat the outside of your mason jar with mod podge. Then quickly adhere the tissue paper and the tree to the mod podge before it dries. You might want to do this part in sections since mod podge dries pretty quickly. You may want to keep wet wipes or a wet paper towel handy since the mod podge will also make your hands pretty sticky!

4.After you have attached all of your tissue paper, put a final coat of mod podge over everything.

5. Stick your candle inside the jar, light it, and turn off the lights for a fantastic fall display. You may want to use battery operated candles with young children, or you can simply forgo the candles and display your colorful mason jars without. 


Pumpkin Moon Sand

Tactile activities are great for young children, and this one smells just like pumpkin pie! Using play sand and a few ingredients from your kitchen, you can make this engaging sensory tool for hours of play!

What You Need:
Play Sand (4 Cups)
Corn Starch (2 Cups)
Water (1-3 Cups)
Pumpkin Pie Spice (1 Tsp)
Orange Food Coloring or Powdered Paint (optional)

1.Mix play sand, pumpkin pie spice, and corn starch together in a large container.

2.Add desired amount of coloring or paint.

3.Slowly mix in water until the mixture reaches your desired consistency. More water = slimier consistency. Less water = play dough consistency. 

4.Use scoopers, buckets, or hands only to play in the sand. When finished, leave your moon sand in an uncovered container to dry. (Do not seal it until it is completely dry, or there will be mold!) Once it is dry, you can seal it in a closed container or plastic bags. Just add water the next time you want to play!

Terrific Turkey Craft


What are YOU thankful for? Inspire gratitude and get your students in the Thanksgiving spirit with this cute, colorful, and easy-to-make craft!

What You Need:
Googly Eyes (or White and Black Construction Paper to make your own)
Glue
Markers
Scissors

1.Turn your brown paper bag upside down so that the opening is facing you, and write what you are thankful on the body of your bag.  
2.Glue a pair of eyes to the top of your bag. 
3.Cut an oblong, tear-shaped beak for your turkey and a bright red snood (term for the red fleshy bit that hangs over the turkey's beak). Glue those just below the eyes.
4. Deck out your turkey with festive feathers on the backside of the bag behind the turkey's face.

Fall crafts for kids


Fall Fox Craft for Child Care Students


Supplies:
* Large Paper Plate
* Orange tissue paper
* White School Glue
* Scissors
* Orange/White construction paper
* One Large Brown Pom Pom
* Stapler

Directions:
  • Trim down your paper plate so it looks like a triangle/fox’s face.
  • Cut the orange tissue paper into 2×2 squares.
  • Slather glue over the paper plate
  • Have your students place the orange tissue paper on their plate.
While your students are covering their paper plate with tissue paper :
  • cut out two triangles out of the orange construction paper  and two circles out of the white. This will be the fox’s ears & eyes.
Finally:
  • Have your students glue the eyes on and then you can staple the ears to the paper plate.
  • Then add the brown pom pom where the nose would be and you have a fox!

Did you try this craft? We would love to see your students creativity! Share your picture with us on our facebook page at: https://www.facebook.com/PureFUN-Daycare-Supplies-Superstore-142153462482252/


The Bery Brown Bear


Supplies:


a stapler


shaving cream

a paint brush

a plastic fork

scraps of construction paper

scissors

a glue stick

Directions:

Start by mixing up your paint:

"Puffy Paint" recipe:  Mix equal parts white school glue and shaving cream.  For this craft you will add brown paint to make a brown bear.

Next, prepare your bear's face:

Cut two small circles out of one paper plate and staple them to the top of another paper plate to be the bear's ears.  The staples will be covered up by the paint.

Now, time to paint him up!   Make the paint nice and thick.  Glob it on. It may take some time to dry, so have your students begin to make the other parts of the bear.

Cut out 2 pink circles to go in his ears, 2 black circles for eyes, a brown snout shape, and a black oval for his nose. 

Use a glue stick to attach them. 

Finally draw a mouth for your Berry Brown Bear.

A perfect pairing for your craft is to read Brown Bear Brown Bear by Bill Martin Jr & Eric Carle during your story time!

Tuesday, October 16, 2018

Halloween Critter Crafts


Ready for some trick or treating fun? Crafting these creepy critters will get your little ones into the Halloween season's spooky spirit!

Paper Tube Bats

What You Need:
Construction Paper (Black, White, and Assorted Colors)
Paper Tubes (such as toilet paper rolls)
Glue or Tape
Scissors

1. Cut enough colored paper to cover your tube, and apply with glue or tape. Fold the paper in at the top and bottom of the tube to create the bat's ears and feet.
2. Draw a template for your bat wing, then cut two wings out of your black paper.
3. Attach the two wings to back of your bat.
4. Glue/tape googly eyes onto the top of the bat.
5. Cut two tiny triangles out for the bat's fangs and glue/tape those just below the googly eyes on the bat's face.
6. Attach to your bulletin board or hang from the ceiling for an awesome Halloween display!

Paper Bag Monsters

What You Need:
Construction Paper (Assorted Colors) 
Circle Punches (optional)
Markers
Glue or Tape
Scissors
Stickers, Glitter, and/or other Embellishments (optional)


1.Choose a paint color and paint your bag, leaving the bag open to dry to prevent the paint from sealing it shut.
2.Once the paint has dried, add embellishments as you wish. Cut out horns, teeth, and tongues. Make your monsters colorful and crazy, silly or scary!
3.Put on a monster puppet show!

Monday, October 15, 2018

DIY Halloween wreath for Kids


What you need:
Paper plate or a cereal box
Black paint
Black,Purple,Green and Orange Tissue paper 
Glue
Orange construction paper
– Ribbon or String for hanging
-Wiggle Eyes

Creating the Spider:

1.      Using orange construction paper, have your child use both hands to make the hand prints on top of each other facing opposite ways to represent the spider like the one above.
2.       Once it dries you can add wiggle eyes.

Creating the Wreath Back Drop:
1.       Cut up your tissue paper into small squares
2.       Cut the middle out of your paper plate to create the wreath shape. If you use an old cereal box, round the corners and then cut out a hole in the middle.
3.       Start scrunching up the squares of tissue paper and apply with glue onto the paper plate wreath .

Finalizing your DIY Halloween Wreath:

1.       Once your hand print spider has dried, cut around each finger to give the appearance of the spider
2.       Ensure that the tissue paper has dried and then glue the spider on the top
3.       Finally when you’re done adding the spider to the wreath, tie a string or a cute ribbon around it so you can hang it on your child's door!

For more craft Ideas, be sure to check out our blog at purefunsupply.blogspot.com

Friday, October 12, 2018

I love my "Mummy"! Halloween craft


Materials needed:
Black construction paper
White construction paper
Popsicle sticks
Black marker

Instructions:
Gather materials.
Cut out a large circle to fill the center of the orange construction paper.
Glue black circle on the orange sheet of construction paper leaving enough room to write a sentence.
Write on the orange paper above the circle: I love my “Mummy” !
Under the circle write: My “Mummy” loves me!

Using the white construction paper cut out 2 small circles for the eyes of the mummy or you can use  wiggle eyes,  glue the eyes on the black circle.
Next have the children glue the Popsicle sticks to the black circle creating their mummy, making sure that they do not cover the mummy’s eyes.

Once completed, let everything dry, so that your student can present it to their Mummy at pick up!


Thursday, October 11, 2018

Mummy Paper Plate Lacing Craft


This Mummy Paper Plate Lacing Craft is a great hand/eye coordination activity for younger children! This craft is super simple and only takes a few supplies!

Supplies needed:

Pre- activity prep:
Punch holes around the edge of the paper plate. We made ours about every half an inch.


Steps:

Begin by making your mummy’s face.: Glue extra large wiggle eyes in place and draw on a mouth with the marker.  Tell your students to be creative!
Once your mummy's face has been created, cut a long piece of yarn then thread it up through the top holes from the back then back through the corresponding top holes and tie it off in a knot.
At that point, begin lacing:  up, through and across, until your mummy is completely bandaged!
When you run out of a string of yarn, simply tie it off in back and tie in a new piece.
Once completed, tie a string from the top hole and hang from the ceiling!

Wednesday, October 10, 2018

DIY Jack O Lantern


Items needed: orange and green construction paper, a canvas panel , scissors and some clear contact paper.

1. Gather your materials.
2. Start by drawing a basic pumpkin shape on your orange construction paper
3. Cut out the pumpkin shape.
4. Place the pumpkin cut out on your cardboard or canvas
5. Using the green construction paper cut out a green stump and add it to the top of the pumpkin.
6.Finally, cover with the clear contact paper


7.Time to create some spooky faces!!


Friday, September 14, 2018

Fall Into Fun Craft Ideas


For the young and the young at heart, fall is the time for jumping into piles of leaves, carving pumpkins, and meandering through corn mazes. Now you can bring the colors of fall inside your classroom with these fun activities celebrating the season. Perfect for a preschool classroom, the crafts listed below teach crucial motor skills and are designed with simplicity in mind. Yet they also make great decorations to display in a classroom or to take home to mom and dad!


Fall Leaf Prints

What You Need:
Blank White Paper 
Plates
Leaves
Glitter Glue (optional)

1.Pour out a little bit of each paint color onto your plates. Combining several paint colors on each plate will create a dazzling mosaic for your prints. Make your prints sparkle by adding glitter glue at this step.

2.Dip your leaves into the desired paint/glitter colors.

3.Press your leaves onto the white paper. Use your fingers to press firmly along the lines of the leaf to make the leaf structure stand out more. If you want to create a huge collage for your class, you might consider doing everyone's prints on the same long roll of paper. On a smaller scale, you can also do individualized collages on regular 8 1/2" x 11" paper.


A variation of this craft is leaf rubbing, in which a leaf is placed under a piece of paper, which is then colored over with crayons or colored pencils to reveal the leaf's structure.


Fall Coffee Filter Trees

What You Need:
Coffee Filters
Cardboard Tubes (toilet paper or paper towel rolls, etc.)
Washable Markers (assorted colors)
Spray Bottle
Water

1.Color your coffee filters with fall colors--typically red, yellow, and orange. Scribbles will do. This doesn't have to be neat since the colors will run together anyway.

2.Lay your colored filters on a flat surface or, preferably, a drying rack (like one you might use for cookies), and mist them with the spray bottle. Don't soak them. They should be lightly damp in order for the colors to spread over the filter but not run off of the filter.

3.Cut slits in the top of your cardboard tubes, and gently bend the slits to make tree branches.

4.Once the filters are dry, simply stuff them into the top of the tube. Now your beautiful fall tree is done!

Pro-Crafter Tip: Ask all your classroom teachers to save the toilet paper & paper towel rolls at the end of each week and store them for future craft projects!


 3D Card Stock Pumpkins

What You Need:
Scissors (child-safe with rounded edges for young children)
Ruler
Dark Orange Fine Tip Marker
Black Medium Tip Marker
Two Split Pins

1.Divide your orange card evenly into 8 sections using the orange marker, marking the sections off with neat hash marks. A ruler will be handy for this step to keep the lines straight and the spaces even. The orange marker will blend into the paper so that it won't show very much once the pumpkin is formed.

2.Cut out 8 strips of orange card along your hash marks. 

3.Punch a hole in one end of each strip large enough for the split pin to go through. (This step may be done by the teacher/parent for young children.)

4.Thread your pieces of card onto the split pin and lock the pin in place. 

5.Repeat steps 3 and 4 with a second split pin on the opposite end of your strips to create the 3D pumpkin. You will want to cut a small strip of green card and attach it to the second split pin to form the stalk. Make sure you thread the green strip onto the pin first so that it will be on the outside of your pumpkin.

6.Decorate the outside of your pumpkin with a black marker to create the face. Voila! Your pumpkin friend is done! Just don't use him to trick or treat, or your candy might disappear!

Friday, September 7, 2018

Smart Snacks in Schools: What They Are and Why They Matter


 What are Smart Snacks?

Smart Snacks came to fruition through the Healthy Hunger-Free Kids Act of 2010. This Act sought to provide students with more nutritious snack options during the school day to supplement their regular school meals, which were already under federal nutrition standards. In the 2014-2015 school year, the USDA began requiring schools to meet these new nutritional standards for "competitive foods," or snacks outside of the federal reimbursable meal program (i.e. breakfast and lunch), that are sold during the school day, whether through vending machines, snack bars, school stores, a la carte, or any other place on the school grounds. Limitations apply to all grade levels but vary by age group (i.e. elementary, middle, and high school). For example, caffeinated beverages may be sold to high school students but not to elementary and middle school students.

Smart Snacks contribute to students' overall health in several ways:
  • They help students form better eating habits earlier in life. Less junk food, more brain food!
  • They fight childhood obesity, high blood pressure, and other health issues.
  • They offer more well-rounded nutrition at school to students who may not have access to healthy foods at home and reinforce healthy eating habits for students who routinely eat healthy foods at home.


Smart Snacks in School standards limit the amount of fat, sugar, sodium, and calorie content of all "competitive" foods and beverages.


Simultaneously, they promote whole grains, low fat dairy products, fruits, vegetables, and protein foods.


According to Smart Snack guidelines, the "school day" refers to the period from the midnight before to 30 minutes after the official school day ends. Student activities occurring on school grounds but after the end of the USDA-defined school day are not subject to the Smart Snack restrictions. For example, the concession stand at an evening football game would not be subject to these guidelines.


 What About School Fundraisers?

There are no restrictions on snacks used for fundraisers if:
  • Fundraising items meet the Smart Snack standards.
  • Fundraising happens during non-school hours as defined by Smart Snack regulations.

Exemptions may be used for items sold during the school day that do not meet the Smart Snack standards, with some restrictions:
  • Each school is allowed 30 exemptions per school year.
  • The fundraiser cannot be longer than 3 consecutive days in length.
  • Each school must complete a tracking sheet that is kept on file for internal auditing purposes.
  • Exempted items may not be sold from 30 minutes before to 30 minutes after any meal service such as breakfast and lunch. 


How do I Choose Snacks that Meet Smart Snack Standards?

To view the Smart Snack Standards for Foods and Beverages, please follow the link here. In addition, there are many great resources out there designed to guide your school in choosing nutritional snacks that meet these new guidelines and planning school events with these guidelines in mind. For your convenience, we have listed some below:

Smart Snacks Calculator
Fundraisers and Smart Snacks
Healthy Fundraising Ideas
Nutritional Lesson Planning
Nutritious Snack Recipes
Steps to Smart Snack Success

To view a listing of our PureFUN! Smart Snacks, please follow the link here

Friday, August 17, 2018

Children's Factory & Angeles Brand Rest Mats, Cots, & Accessories


As the hustle and bustle of a new school year begins, don't forget to recharge your brain and rejuvenate your body with some extra rest during the day! Finding time to rest and recuperate can be challenging, but even a 20-30 minute nap can make a world of difference for you and your students!

Why are naps so important for children (besides giving parents and teachers a break)? Recent scientific studies show that naps improve cognitive development and memory, helping kids remember what they've learned during the day. When children's highly active brains get the chance to rest, they have longer attention spans, overcome challenges more easily, are less irritable during the day, and more readily go to sleep at night.

To ensure a better nap time for your children this year, PureFUN! has a variety of rest mats, cots, and accessories from Children's Factory & Angeles Brand to fit the needs of your childcare center!


  • Folding Germ-Free Rest Mats: Keep your kids safe from germs, and prevent the spread of disease in your classroom. Radio frequency vinyl welding technology seals the seams of these kids' mats, which protects the foam padding from liquid and bacteria contamination. Available in 1" and 2" thicknesses. Easily folds into 4 sections for ease of storage. Dual color combination.
  • Non-Folding Germ-Free Rest Mats: Heat-sealed waterproof and antimicrobial vinyl is easy to clean, comfortable, and durable. Available in 2" thickness only. Sold individually and in a 4-pack.
  • Super Rest Mats: Extra padding makes sleeping on this rest mat cool and comfortable. This mat features 3 layers: two outer layers of heavy duty 3 ply nylon and an inner layer of nylon mesh. Available in 2" thickness only. Dual color combination.

  • Tough Duty Folding Rest Mats: These comfortable kids' folding rest mats feature waterproof seals between sections and an easy-to-clean vinyl cover. Available in 1" and 2" thicknesses. Available in a set of 5 for the 2" or a set of 10 for the 1".
  • Infection Control Folding Rest Mats: Protect your kids from germs, and prevent the spread of disease in your classroom. Radio frequency vinyl welding technology seals the seams of these kids' mats, which protects the foam padding from liquid and bacteria contamination. Available in 1" and 2" thicknesses. Available in packs of 5 or 10 with three different color options. You can even get one with a built-in pillow!
  • Flat Rest Mats: These 2" thick kids' rest mats feature smooth, easy-to-clean vinyl covers with inside stitching for smooth edges and a clear plastic name tag holder to label each child's mat as his/her own. Available in two different sets of 5 colors each.                              

                 Rainbow Flat Rest Mats                                      Woodland Flat Rest Mats

Angeles Cots and Cot Accessories


  • Spaceline Cots: Available in 4 different colors, these kids' cots feature strong, bleach-cleanable Sof-Tex fabric, fully enclosed ends, heat-sealed seams, and oval tubing. One-piece construction means these ship fully assembled! Available in Standard and Toddler size. Get them individually or as a 4 pack! Each cot comes with a 10-year guarantee.
  • Value Line Cots: Vinyl-coated mesh material makes this cot tough and designed to last. This cot features a super grip closure at the foot end and easily wipes clean. Available in Standard and Toddler size. Get them individually or as a 4 pack! Each cot comes with a 10-year warranty. 
  • Premier Cots: These comfortable wedgewood colored cots feature strong, bleach-cleanable Sof-Tex fabric, heat-sealed seams, and corner-to-corner fabric. Cots ship fully assembled. Available in Standard and Toddler size in sets of 4. Each cot comes with a 7-year guarantee.
Cot Accessories


Cot Sheets

Available in Standard and Toddler Size and in both White and ABC Print, these cot sheets fit snugly onto cot corners by their elastic straps. Cotton/poly blend sheets are machine washable and dryable.


Make the most of your cots during playtime! Save space and cost with this set of 20 cots, 1 cot carrier, and a bonus activity center set. The activity center set includes 1 activity tabletop and 4 activity boards that snap between the stacked cots, along with 25 pegs, 30 magnetic letters, 36 Mega Bloks, and 52 flannel letters.


This set of name clips makes it easy to label and re-label your cots for years to come without having to permanently mark them!


This sturdy carrier fits up to 24 cots and includes wheels for easy mobility. Carrier fits all Angeles brand cots.

Children's Factory Cots and Cot Accessories 


Featuring durable steel side rails, a moisture-proof, vinyl-coated, open weave bed, and heat-sealed bed seams, these cots will support and comfort your little ones for a restful nap time. Easily wipe them clean after use. They stack comfortably on top of each other as well as most other cots due to their rounded legs for easy storage in your daycare classroom. Available in Full-Size or Toddler-Size.

Cot Accessories


Easily transport your cots to wherever they are needed in your daycare with this rolling cot carrier. 15 to 20 cots fit comfortably onto the carrier. 


Keeps your kids warm and cozy! Machine washable and dryable 100% cotton double-napped surged blanket comes in an extra long length, perfect for kids' cots and rest mats.

Cot Sheets

Available in Fitted, Full-Size, and Toddler-Size, these cot sheets fit snugly onto cot corners by their elastic straps. Cotton/poly blend sheets are machine washable and dryable.