Showing posts with label Holiday Crafts. Show all posts

Monday, November 15, 2021

21 Amazing Facts About Thanksgiving to Share with Your Family and Friends

Thanksgiving is the second most popular holiday in the United States, according to a Harris poll (2015). People drive 50 miles or more to see family, eat too much, and watch lots of football. Millions also watch the annual Macy’s Thanksgiving Day Parade.

What do you and your family do?

If you need something to talk about, these Thanksgiving facts will spark conversation.

Thanksgiving Turkey Trivia

  • The Butterball Turkey hotline takes over 100,000 questions about cooking the holiday feast each year.
  • Americans eat over 44 million turkeys (averaging 16 pounds apiece) on Thanksgiving. If you put all that meat on a scale, it would weigh 704 million pounds.
  • TV dinners got their start after Swanson overbought 260 tons of turkey. A sales rep named Gerry Thomas suggested they package the turkey with peas, dressing, gravy, and sweet potatoes in tin trays like the airlines used. 10 million trays sold the first year and TV dinners won a permanent spot at the grocery store.
  • Ben Franklin wanted the turkey to be America’s national mascot.  In a letter to his daughter, he wrote “the Turkey is in Comparison (to the bald eagle) a much more respectable Bird.”
  • Studies show it’s not the tryptophan in turkey that makes you sleepy.  It’s the 4500 calories of food you ate on Thanksgiving.
  • 8 in 10 people say they prefer Thanksgiving leftovers.

These Turkey Accents will brighten up your classroom for Thanksgiving.

The Macy’s Thanksgiving Parade Trivia

  • The first Macy’s Thanksgiving parade was in 1924.  It was so popular they got a TV contract with NBC a few years after.
  • The first balloon character was Felix the Cat.  They hadn’t planned to deflate it, so it drifted up and popped shortly after the parade ended.
  • The first parade featured animals from the Central Park Zoo, puppets on floats, and no        balloons.
  • 3.5 million people go to New York City to watch, some arriving as early as 6:30 AM to grab a good spot. Over 50 million watch the parade on TV. 
  • Macy’s parade is the largest float parade in the world. 
  • Sonic the Hedgehog is the first video game character to get a balloon in the parade.
  • Peanuts character Snoopy has the most balloons, with 8 featured in the parade since 1968.

Decorate your bulletin board with this Fall Winter Snoopy Pose Bb Set. 


Holiday Football Facts

  • The first football game played on Thanksgiving was in 1876.  Yale took on Princeton.
  • The Detroit Lions have played every Thanksgiving since 1934.  The only exception was when the players were called to fight in World War 2.
  • The Dallas Cowboys have played all but 2 Thanksgivings since 1966.
  • The Jacksonville Jaguars have never played on Thanksgiving Day.

Need a football to toss with family and friends on Thanksgiving?  We’ve got some:
Coated Foam Ball Football (softer for the kids)  Football Official Size

How Thanksgiving Became a National Holiday

  • George Washington declared a National Day of Thanks on November 26, 1789. He wanted Americans to thank God for protecting them and helping them achieve independence.
  • Thomas Jefferson didn’t want Thanksgiving to be a national holiday. He felt it would violate the First Amendment separation of church and state. 
  • Sarah Josepha Hale lobbied to make Thanksgiving a holiday for decades. Finally, in 1863, President Abraham Lincoln granted her wish. She was also known for writing the childhood favorite Mary Had a Little Lamb.
  • The first U.S. President to officially pardon a turkey was John F. Kennedy.

Welcome guests with this Thanksgiving Allinone Door Décor Kit.  

Thanksgiving Activities for Preschoolers

Turkey Dinner Collage

All you need is some glue, scissors, food clip art you can print out, and paper plates. Have the children cut out their favorite foods and glue them on the plates. (Thanks to PreKinders for this idea.)

Thankful Cards

One piece of construction paper should do. Have them write what they’re thankful for. Encourage them to add a picture they draw or paste on. Studies show that grateful people are happier, get better grades, and don’t get sick as often as ungrateful people.

Thanksgiving Countdown

Make a paper chain with enough links to count down the days until Thanksgiving. Each day a student tears off one link and everyone counts what’s left. (Thanks to Preschool Plan-it for this one.)

We hope you have a wonderful Thanksgiving celebration. If you’d like to share your Thanksgiving traditions with us, we’d love to hear about them!


Thursday, December 7, 2017

Rudolph Frame


Supplies Needed:
Directions:
  1. Paint your kids hands and press them on white construction paper.
  2. Cut their hand prints out when dry.
  3. Have them paint the wooden frame.
  4. When the wooden frame is dry, glue on bow, eyes, nose and hand antlers.
  5. If you would like, add the child's photo to the frame before sending it home with the parents!


Monday, December 4, 2017

Snow Globe Christmas Ornaments


These adorable snow globe cup ornaments are the perfect thing to make for Christmas gifts!

Supplies Needed:


Directions:

Print the Childs picture and cut it out around the child's silhouette.

Fold the bottom of the photo and glue the folded part of the photo to the construction paper. This is used for the bottom to keep the fake snow in the cup.

Grab your Disposable Plastic cup and use a pipe cleaner for the top to use to hang on the tree. Poke it through the top and twist the ends together.

Add the fake snow and glitter into the cup.

Hot glue the construction paper to the bottom of the cup

And now you have a completed snow globe :)

Tuesday, May 16, 2017

Patriotic Handprint!


clip_image002[4]

what you will need:

Grab your blue paper and set it on the table vertically

Follow these steps on painting the child’s hand:

1. Base of the palm will have the blue square opposite of the thumb

2. Using the red and white paint, draw thick stripes

Once the child’s hand has been painted, press Childs hand onto the construction paper,

Have the child rinse his or her hand off.

Once the handprint dries, use the white paint to draw a star on the blue square.

What a fun craft for kids on Memorial day!

Wednesday, December 21, 2016

Christmas Graham Cracker House


imageimage
Items needed:
  • Graham Crackers
  • Favorite gummy candies (gumdrops, sour patch kids, Swedish fish)
  • Sprinkles
  • Mini m&m’s
  • Marshmallows
  • Teddy Grahams 
  • Melting Chocolate/icing
  • Plates
Each child should get two full-size graham crackers per house. The Graham cracker should be broken into halves, creating 4 pieces for the children to use and create their house.(2 pieces will be for the foundation of the house and the remaining 2 pieces will be for the roof of the house.)
Creating the foundation to the house, Grab your icing/melted chocolate and 2 pieces of the graham cracker. You will want to add your icing/chocolate to the top of each of these. then stack them on top of one another with the frosting facing up on both. (The icing/ melted chocolate will act as the “glue” to keep the house together.)On the top piece of the frosted foundation have the children decorate it. adding one of the sour patch kids or teddy graham to the center( giving the house someone to live in it.)
Next add the roof of the house in an upside down v position. Add icing/melted chocolate to where the top of the roof connects. while you still have the icing/ melted chocolate, add some to both sides of the roof and decorate those with your favorite gummy candy.
Now it’s time to admire your art and better yet eat it!


Thursday, December 8, 2016

Reindeer treats for the classroom


Ingredients needed:
  • Graham crackers
  • Peanut butter
  • Raisins
  • Mini pretzels
  • M&Ms
Directions:
1. Have the children spread the peanut butter on a graham cracker square. Give the children spoons and show them how to use the rounded edge to spread the peanut butter.
2. Let the children get two mini pretzels to add as the reindeer’s antlers.
3. Have the children add two raisins for the reindeer’s eyes.
4. Let the children choose an M&M for the reindeer’s nose.
5. Let the children enjoy their snack with a tasty cup of PureFUN! 100% Concentrated Juice

Wednesday, November 30, 2016

How to make the Grinch grin classroom craft


imageimage

Items needed: red, yellow, green, white & black construction paper, crayons, cotton balls, ribbon, bells, pom-poms, glue, scissors, curling ribbon, glitter, camera

You will want to get a photo of each kid in the class. It can be printed in black & white or in color depending on your resources.

Once you have the photos cut out, glue them to the bottom left hand side of the black construction paper.

Using a white crayon, write the Childs name (if it’s a girl follow her name with - Lou Who, If its a boy follow his name with a –Who Who) add curly cues to make the names more decorative.

Take the red construction paper and cut out a Santa’s hat, its a curved triangle.

With the green construction paper you will be cutting a light bulb shape, keep in mind the children will be adding a smile to the bottom part of this light bulb shape, make sure it’s big enough for the children to write a few sentences on how they would make the Grinch smile.

Using the yellow construction paper cut out two teardrop shapes for the eyes of the Grinch, rounded on one end and pointy on the other end.

Now on white construction paper cut out a big “U” shape for the smile of the Grinch.Have the children write how they would make the Grinch smile or if its for the younger children have them draw a photo.

Once the children have written their sentence or drawn their photos, have them assemble and glue the grinch to the black construction paper, using a black marker have them draw a circle for his nose and color in his eye balls.

Finally, let them loose on all the other decorative items they have at their tables (yarn ,ribbon, glitter, string, pom-poms and anything else you can think of craft wise to add) have them glue these items to the top of their heads to create fun hairstyles just like the Who’s had in the book.

Tuesday, November 29, 2016

Santa Plate for the Classroom

image

It’s beginning to look a lot like Christmas, It’s time to DECK THE HALLS and walls and windows of your classrooms and FALALALALA with the children as they create the man of the Month SANTA!

what you will need for this project: white paper plate, skin tone colored Crayola markers or Crayola paint, Wiggle eyes, pom-pom balls, red construction paper, glue and lots of cotton balls.

Flip your plate over so that the bottom of the plate is facing up.

Using either the markers or paint have the children color/paint the center of the plate.

Using the red construction paper have the children or yourself cut a triangle with the right side of the triangle curving inwards to create Santas hat.

Grab some glue  and at the top of the colored circle, glue Santa’s hat centered with the right side curving to the left.

Grab two wiggle eyes and one red pom-pom ball and glue the eyes 2” from the bottom of the hat. You will want to make sure there is enough room to add cotton balls to the bottom of the hat without them covering the eyes.

Next it’s time to add the pom-pom ball as Santa’s nose, glue it below the eyes, but keeping it in between the eyes.

Now that it’s time to add all the cotton balls to create Santa’s famous Beard!

First you will want to finish the hat, grab five cotton balls, four will go on the bottom of the hat above the eyes, and your fifth cotton ball will go at the point of the hat at the top. This concludes the hat.

Now for Santa’s beard, you can use two techniques for this part, 1.you can do two circles one around the outside of the center circle of the plate and one on the center of the rippled trim of the plate. 2. the children can do dots where they want the cotton balls to go.

Once you figure which technique will work better for your time frame and or class, have the children add their cotton balls to the glue to finish off the beard.

You better watch out, you better not cry ‘cuz SANTA CLAUS IS COMING TO TOWN!! Well in this case… THE CLASSROOM! Smile

Tuesday, November 8, 2016

Thanksgiving classroom craft


image

It’s turkey time, let’s make a gobbling turkey plate!

What you will need: paper plate, orange,red,yellow & red paint, white construction paper, red construction paper, wiggle eyes, paint palette. paint brush, glue, art apron

  1. Put your different colors of paint in a paint palette and put on your art apron.
  2. Paint the center of the plate: brown
  3. On the rippled rim of the plate: use the red, yellow, orange and just a little bit of brown paint. You will want to alternate the colors creating a pattern
  4. With white construction paper, cut two medium size circles, glue them on the center of the plate towards the top, overlapping one another just a bit for the eyes.
  5. Using the yellow paint, you will paint a triangle under the two white circles in the center of the plate to create the nose.
  6. With the red construction paper, you will cut a rounded squiggle shape to glue on the side of the nose.
  7. Grab your wiggle eyes and glue them to the center of the two white circles to complete your turkey.

That’s all there is to it! We hope you have a gobbling good time!

Monday, October 10, 2016

Jack the Jack O’Lantern


clip_image002

Jack O’ Lantern Fun & Easy Kids Craft!

First things first get all of your supplies Smile here is a list of what you will need:

· Paper plates

· Glue

· Orange tissue paper

· Green,brown & black Construction paper

· Scissors

Step 1: Cut the orange tissue paper into squares

Step 2: Cut the brown construction paper into rectangles (for the stem)

Step 3: Cut the black construction paper into three triangles (for the eyes and nose of the Jack O’ Lantern) and then cut a smile (feel free to be creative with your smile/eye cut outs)

Step 4: Trace the children’s handprints on the green sheet of construction paper

Step 5: Cut the hand prints out (for the leaf)

Step 6: Have the children glue the orange squares of tissue paper onto the back side of the plate

Step 7: Have them glue the brown rectangle to the top left side of the pumpkin and then glue the green hand print on as the leaf of the pumpkin

It’s finally that time to add the finishing touches!!!

Step 8: Have the children glue the face to their pumpkins in their own creative way.

Don’t forget to have them sign their names to their pumpkins!

Hope everyone has as much fun making these Jack O’ Lanterns in their class as much as we did!

Friday, September 30, 2016

Creppy Crawly Spiders

These spiders can be made from paper or foam cups. We have provided a cute friendly version as well as a traditional

Who wouldn’t mind coming across these creepy crawlers in your classroom, I know I wouldnt!!

What you will need for both friendly and scary spiders:

  • Foam or Plastic cup,
  • Acrylic paint: black, white, orange, green, red, & purple
  • Wiggle eyes 
  • Foam applicators
  • Red and Black Sharpie markers
  • White paint pen
  • Toothpicks
  • Chenille stems: red, orange, purple, green and black

Step 1: Paint foam or plastic cup in desired color, black or orange. Set aside to dry.

Step 2: Line up all the Chenille stems  together evenly, cut in half. Bend each stem half about 1/3 of the way down, Set aside for step 6.

Step 3: For the black spider's eyes, dip the round applicator in white paint and gently press and turn on the front of the cup.

Step 4: Use a white paint pen to add a line for a mouth. Use a toothpick dipped in red paint to ad eyebrows, nostrils and fangs.

Step 5: For the friendly spider, add some spots to the cup with your purple,green,red paints. Glue on 2 wiggle eyes (use different sizes for fun!). Draw a smile on with a red Sharpie marker, with white paint pen add tooth and with black marker add nose.

Step 6: To add the legs, poke the shorter end of the bent Chenille stems  into the cup. Repeat so that there are 4 legs on each side. Bend the bottom of the long end of the Chenille stems  to form a foot.


Hope you enjoy your Creppy Crawly friends this Halloween!

Thursday, March 10, 2016

St Patrick’s Day Crafts

clip_image001     clip_image001[4]

Get out your green paint and help your little ones create these adorable hand print and fingerprint clovers! This craft is an excellent choice for every age group in your childcare or daycare center. You can even have them create these designs on shirts to wear on St. Patrick’s Day!

clip_image001[7]

All you need for this lucky leprechaun is construction paper (green,yellow and black), a paper plate, orange paint, a marker, scissors and glue. Start by painting the outer edge of the plate orange. While this dries you can cut out the materials for the hat and glue the pieces together. Finish off your leprechaun by gluing it’s hat into place and drawing on his happy face. 

    clip_image001[9]

Crafting and snacking is always a fun combo. These crafts feature a child favorite cereal, Fruit Loops. To create the Fruit Loop rainbow, have students separate the colors and then place them in an arch following “ROY G BIV”. The clouds are just a pile of mini marshmallows. You can have them glue these down or skip the glue and allow them to eat their Fruit Loops and marshmallows when they are done.

For the “I’m so lucky” necklace, cut out shamrocks and hole punch them. Next give every student a piece of string long enough to easily fit over their head once tied together. Have students string about a fourth of the necklace with Fruit Loops, then add on the shamrock. Next they can string another fourth of Fruit Loops and tie off the ends. Now they have a necklace to wear for St Patrick's day. They can even eat the Fruit Loops off the string as the day goes on! 

clip_image001[11]

For our last craft, cut some shamrocks out of green construction paper. Then using different shades of green construction paper, scrap book paper or tissue paper, cut small squares. Give each of your students a glue stick and let them glue on the squares. It’s an easy craft with a really artsy result!

Friday, January 29, 2016

What I Like About You - Valentine Craft

This Valentines day craft is the perfect gift for everyone on your valentines day gift list! You can use this craft as gifts for your student’s friends, parents or siblings. You can even set up these jars on each student’s desk and have them write a note to each classmate on Valentine’s day as a substitute for Valentine’s.


All you need is a jar and a few pieces of scrap paper cut into strips. If you are using this for a class, be sure to give enough strips for each student. You can also give your students time to decorate their jars before filling them with “things they like” about that person. Don’t forget to put out some construction paper, string, stickers, markers, and whatever else you might need for decorating!

Wednesday, January 20, 2016

Bee My Valentine

Valentine’s Day is approaching quickly and we have some great Valentine Ideas for you! We are starting off with this adorable Bee that is a great choice for all ages in your daycare or childcare center. All you need is construction paper in yellow, black and red, brown or black chenille stems, glue and a black marker.


Start by cutting out 6 large hearts. You will need 2 of each color. You will also need to cut out 4 small hearts using the red construction paper only.
Tip! You can easily cut out the perfect heart every time by folding the paper in half and cutting in a bit of a rain drop shape.
Now you are ready to start gluing your hearts into place. Using the black heart as your base, add a bit of glue to the upper half of the heart. Then add your yellow heart on top of it, leaving a small space of black at the bottom. Repeat this step with the next two hearts while continuing to alternate colors. This will give you the stripe effect of a real bee.

Next, take you big red hearts and glue them onto the back of your yellow and black heart stack with the bottom point of each heart meeting in the middle. This will create the wings of your bee. Go ahead and glue your chenille stems into place at the top of the yellow heart. You may want to tape these to make it sturdier.

You can now take your marker and add on your bee’s face. You can also add on the note seen above, “Bee my valentine”, or any other note of your choice.

Lastly, add your small hearts by either gluing or taping them onto the ends of the chenille stems and on the end of each side of the mouth.

Now you have a “BEEautiful” valentine to share with someone you love!

Thursday, December 17, 2015

Christmas Cookies

 This adorable melting snowman is the perfect cookie for a delicious treat and a good laugh. With the cookie of your choice, take some white frosting and spread it across the top. You can also try melting the icing in the microwave and pouring it onto the cookie. This will give the illusion that your snowman is melting. Next, add on a marshmallow to be the snowman’s head. Lastly, add on your snowman’s features with icing or food pens.

Reindeer Cookies are just as simple to make! Again, using the cookie of your choice, create your base. You will want your cookies to have a bit of an oval shape so you may need to have a cookie cutter handy. While the cookies are still a bit warm, add on two pretzels for the antlers and three m&ms for the eyes and nose. This is a great one for the kids to help with decorating! If you have trouble getting the features to stick, try using a bit of icing to hold things in place!

PureFUN! Supply wishes you a very Merry Christmas and Happy New Year! Meet us back here for our first blogs of 2016! 

Thursday, December 10, 2015

Holiday Craft and Gifts Ideas – Holiday Handprints

Handprint Crafts are the perfect choice for all ages in your school, daycare or childcare center! With a little help from a teacher or parent, students can easily recreate these handprint crafts and use them as gifts for the holiday season. Add the following designs onto T-shirts, cards, ornaments and more!

Five little fingers create the perfect five little snowmen! Paint the entire palm of the hand along with the inner side of the fingers white and stamp down firmly to create the base. Finish off the snowmen by painting on their features and whatever accessories you would like them to have.

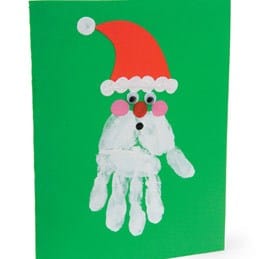
This adorable Santa handprint is easy to recreate. Start by stamping your handprint onto the top half of your page. Once you have made your handprint, flip the paper around so that the top is now the bottom and your handprint resembles Santa’s beard. (Fingers should point downward.) Next add on Santa’s facial features and of course his hat! Each of these can be painted on. To keep it easy for little ones, give them a circular paint sponge and let them stamp on the features. Lastly, add on a set of wiggle eyes!


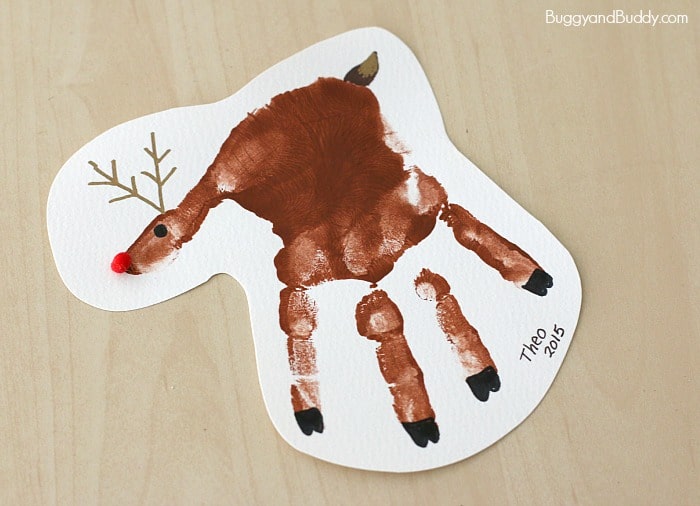
Let’s not forget about the Reindeer that pull Santa’s sleigh! Have students make their handprint with their fingers spread apart. The fingers should be pointed downward with the palm towards the top of the base they are printing on. Finish off your reindeer with a set of hooves on the tips of each finger, a red nose on the tip of the thumb, a small tail opposite the thumb, reindeer antlers and an eye.

Thursday, December 3, 2015

Holiday Crafts & Gift Ideas – Reindeer Prints

This Holiday crafted gift idea is sure to leave a print on the hearts of the ones who receive it! With just a few fingerprints you can create an adorable holiday card, bag, hat and more! All you need is brown finger paint or a brown stamp pad, red paint or a red marker, and a black thin tip marker.

clip_image001

Add your fingerprint to whatever white base you will be using. You can add enough prints to represent your family, one for each of Santa’s reindeer, or however many you would like. Try using different fingers to get the different sizes and prints.

Add the antlers, nose and eyes with your thin tip marker once the paint has dried. Lastly, take your red marker or red paint and add on your reindeer’s nose. You can add your favorite holiday greeting, a name or anything else you would like to decorate with underneath to finish things off.

Now you have an adorable gift to give to your loved ones this holiday season! This craft can be modified for all ages in your school or daycare center too!

Be sure to check back in here for more holiday gift ideas, crafts, snacks and more!

Friday, November 13, 2015

Thanksgiving Crafts - Turkey Prints

Here’s another turkey craft to enjoy with your little ones. You will need finger paint in red, yellow and brown. Start by painting the hand red and stamping it three times with the palms meeting at the bottom to give it a “V” shape. Next add two yellow handprints between the three red ones to add some color to the feathers.

clip_image001

Next, paint the bottom of the foot brown and print it on top of the hand prints with the heel at the top and the toes at the bottom. Lastly, you can add on the beak, snood, feet and some wiggle eyes.

Now you have an adorable Turkey for the Holidays. You can even have students do this onto a t-shirt or a tote bag!

Tuesday, November 3, 2015

Thanksgiving Crafts - Fingerprint Turkey

This fingerprint turkey is the perfect craft for the upcoming Thanksgiving holiday! You will need finger paint in light orange or yellow, orange, red and brown. You will also need a bit of black and white paint as well for the finishing touches.

clip_image001

Lets get started! Begin by dabbing your pointer finger into the light orange or yellow color. Create an arc by printing your finger onto the page about 8-10 times. Next, take the red color and make a smaller arc beneath it using the same technique. Repeat this step once more using the red paint to complete the tail.

If you have gone for the facing forward Turkey, paint your thumb brown and stamp it vertically into the middle to be the body of the turkey. If you have gone for the side view you will want to print your thumb horizontally from the middle and then add a head by printing in brown with your pointer finger vertically.

Don’t forget to add on the finishing touches with eyes, a beak, legs and feet! Now you have an adorable craft for Thanksgiving. Try having your students do this on the front of a blank card. Then have them write to someone they are thankful for and tell them why they are thankful for them.

Tuesday, October 20, 2015

Creepy Crafts for Halloween – Q-Tip Skeleton


clip_image001

You will need 21 Q-tips per skeleton. Start by cutting 6 of those Q-tips in half. Next, take a white piece of paper and cut out your skull shape. It should look a bit like an upside down pear when you are finished. Now you can draw on the eye and nose holes and some teeth to make your skeleton’s face.

Using your favorite color construction paper, glue the head onto the top of the page. Now we are ready to start constructing the skeleton. Start by gluing one full Q-tip vertically underneath the head. This will act as the spine. Next, evenly space and glue 6 of the full size Q-tips horizontally across the spine.

Think of the two ends of the top Q-tip as the shoulders and the two ends of the bottom Q-tip as the hips. You will need two full size Q-tips for each arm. Place them in a “V” shape coming from each shoulder. Next we can add on the legs. Take two more full size Q-tips for each side and place them in a zigzag formation coming from the hips.

Lastly, take 5 of the Q-tip halves to create the fingers for each hand. The final two can be glued horizontally on to the end of each leg to be the feet.

Now you have an adorable skeleton that is ready to be hung up for Halloween!