Wednesday, November 14, 2018

10 Best Christmas Crafts for Kids

Christmas Crafts for Kids: Edible and Decorative Activities for your Classroom


Looking for creative new Christmas crafts to engage your class? Tired of doing the same activities year after year? This collection of our ten best Christmas activities for kids will provide hours of fun festivities for your little ones. Below you will find 5 decorative & 5 edible craft ideas! Edible crafts make delicious holiday snacks, while decorative crafts make festive decorations for your classroom or Christmas gifts to take home to mom and dad!

Top 5 Decorative Christmas Craft Ideas: 


1. Rudolph Frame


http://purefunsupply.blogspot.com/2017/12/rudolph-frame.html

Of course everyone's favorite reindeer deserves a spot on your Christmas craft list! Put a class photo inside to complete this cute take-home craft!

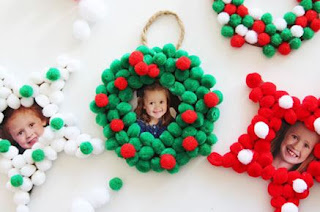
http://purefunsupply.blogspot.com/2017/12/pom-pom-ornaments.html

Decorate your classroom or school tree with these colorful Christmas ornaments, personalized with the picture of the child artist who made them!


3.  Holiday Hand Prints


http://purefunsupply.blogspot.com/2015/12/holiday-craft-and-gifts-ideas-holiday.html

 Put a fun holiday spin on traditional hand prints with this easy craft for kids of all ages!  We'll show you how to make reindeer, snowmen, or Santa Claus! Use these to decorate the front of handmade Christmas cards, t-shirts, or bulletin board and hanging decorations.


4.  Reindeer Prints


http://purefunsupply.blogspot.com/2015/12/holiday-crafts-gift-ideas.html

A similar Christmas craft is this adorable reindeer fingerprint design, easily modified for kids of all ages and decorations of all sizes!


5. Christmas Tree Plate


http://purefunsupply.blogspot.com/2016/12/christmas-tree-plate.html


Make this gem of a Christmas tree sparkle and shine with glitter, stickers, beads, and any other "ornaments" you may find!


Top 5 Edible Christmas Craft Ideas:


1. Christmas Graham Cracker House


http://purefunsupply.blogspot.com/2016/12/christmas-graham-cracker-house.html

Forget the gingerbread house! Hansel and Gretel would agree, this graham cracker house is sweet enough to eat! Check out our CACFP-approved graham cracker bears! For more CACFP-approved goodies, check out our full listing here!


2. Peanut Butter Pretzel Reindeer


http://purefunsupply.blogspot.com/2016/12/reindeer-treats-for-classroom.html

Another neat graham cracker treat is this friendly Rudolph snack! For an allergen-friendly treat, use any type of seed butter or peanut butter alternative and gluten-free pretzels.


3. Strawberry Banana Candy Cane


http://purefunsupply.blogspot.com/2014/12/healthy-holiday-snacks-christmas.html


Simple, sweet, and healthy to eat, this candy cane won't hang around for long!


4. Strawberry Banana Santa Claus


http://purefunsupply.blogspot.com/2014/12/healthy-holiday-snacks-christmas.html

Don't miss putting these precious mini Santa's on your Christmas snack list this year!


5. Celery Celebration Tree


http://purefunsupply.blogspot.com/2014/12/healthy-holiday-snacks-christmas.html


Trim this tree with any assortment of veggies for a very merry healthy holiday snack!


We love Christmas and Holiday craft ideas here at PureFUN! Supply! They keep us smiling! We would love to see your students creations! Like us on Facebook and post a picture of your students with their work!
Also, comment below and tell us which craft you will try this December!


Friday, November 2, 2018

Fun Fall Crafts for Kids


While the weather gets colder, stay warm and cozy with these fantastic indoor crafts in fabulous fall colors. Try these with your class or with your kids at home over Thanksgiving break!


Fall Luminaries

Use these warm and inviting luminaries to decorate your classroom or let your students take them home as gifts! This craft will help younger children work on their fine motor skills, while older children will have fun using creativity to make their luminaries more elaborate.

What You Need:
Mason Jars
Mod Podge
Candles (tea candles are the perfect size!)
Wet Wipes (or wet paper towels)

1.Tear your colored tissue paper into small strips. 

2.Cut a tree shape out of brown construction paper. (You can make your tree as simple as the photo above or add more branches, etc.)

3.Using your paintbrush, coat the outside of your mason jar with mod podge. Then quickly adhere the tissue paper and the tree to the mod podge before it dries. You might want to do this part in sections since mod podge dries pretty quickly. You may want to keep wet wipes or a wet paper towel handy since the mod podge will also make your hands pretty sticky!

4.After you have attached all of your tissue paper, put a final coat of mod podge over everything.

5. Stick your candle inside the jar, light it, and turn off the lights for a fantastic fall display. You may want to use battery operated candles with young children, or you can simply forgo the candles and display your colorful mason jars without. 


Pumpkin Moon Sand

Tactile activities are great for young children, and this one smells just like pumpkin pie! Using play sand and a few ingredients from your kitchen, you can make this engaging sensory tool for hours of play!

What You Need:
Play Sand (4 Cups)
Corn Starch (2 Cups)
Water (1-3 Cups)
Pumpkin Pie Spice (1 Tsp)
Orange Food Coloring or Powdered Paint (optional)

1.Mix play sand, pumpkin pie spice, and corn starch together in a large container.

2.Add desired amount of coloring or paint.

3.Slowly mix in water until the mixture reaches your desired consistency. More water = slimier consistency. Less water = play dough consistency. 

4.Use scoopers, buckets, or hands only to play in the sand. When finished, leave your moon sand in an uncovered container to dry. (Do not seal it until it is completely dry, or there will be mold!) Once it is dry, you can seal it in a closed container or plastic bags. Just add water the next time you want to play!

Terrific Turkey Craft


What are YOU thankful for? Inspire gratitude and get your students in the Thanksgiving spirit with this cute, colorful, and easy-to-make craft!

What You Need:
Googly Eyes (or White and Black Construction Paper to make your own)
Glue
Markers
Scissors

1.Turn your brown paper bag upside down so that the opening is facing you, and write what you are thankful on the body of your bag.  
2.Glue a pair of eyes to the top of your bag. 
3.Cut an oblong, tear-shaped beak for your turkey and a bright red snood (term for the red fleshy bit that hangs over the turkey's beak). Glue those just below the eyes.
4. Deck out your turkey with festive feathers on the backside of the bag behind the turkey's face.

Fall crafts for kids


Fall Fox Craft for Child Care Students


Supplies:
* Large Paper Plate
* Orange tissue paper
* White School Glue
* Scissors
* Orange/White construction paper
* One Large Brown Pom Pom
* Stapler

Directions:
  • Trim down your paper plate so it looks like a triangle/fox’s face.
  • Cut the orange tissue paper into 2×2 squares.
  • Slather glue over the paper plate
  • Have your students place the orange tissue paper on their plate.
While your students are covering their paper plate with tissue paper :
  • cut out two triangles out of the orange construction paper  and two circles out of the white. This will be the fox’s ears & eyes.
Finally:
  • Have your students glue the eyes on and then you can staple the ears to the paper plate.
  • Then add the brown pom pom where the nose would be and you have a fox!

Did you try this craft? We would love to see your students creativity! Share your picture with us on our facebook page at: https://www.facebook.com/PureFUN-Daycare-Supplies-Superstore-142153462482252/


The Bery Brown Bear


Supplies:


a stapler


shaving cream

a paint brush

a plastic fork

scraps of construction paper

scissors

a glue stick

Directions:

Start by mixing up your paint:

"Puffy Paint" recipe:  Mix equal parts white school glue and shaving cream.  For this craft you will add brown paint to make a brown bear.

Next, prepare your bear's face:

Cut two small circles out of one paper plate and staple them to the top of another paper plate to be the bear's ears.  The staples will be covered up by the paint.

Now, time to paint him up!   Make the paint nice and thick.  Glob it on. It may take some time to dry, so have your students begin to make the other parts of the bear.

Cut out 2 pink circles to go in his ears, 2 black circles for eyes, a brown snout shape, and a black oval for his nose. 

Use a glue stick to attach them. 

Finally draw a mouth for your Berry Brown Bear.

A perfect pairing for your craft is to read Brown Bear Brown Bear by Bill Martin Jr & Eric Carle during your story time!