Monday, November 15, 2021

21 Amazing Facts About Thanksgiving to Share with Your Family and Friends

Thanksgiving is the second most popular holiday in the United States, according to a Harris poll (2015). People drive 50 miles or more to see family, eat too much, and watch lots of football. Millions also watch the annual Macy’s Thanksgiving Day Parade.

What do you and your family do?

If you need something to talk about, these Thanksgiving facts will spark conversation.

Thanksgiving Turkey Trivia

  • The Butterball Turkey hotline takes over 100,000 questions about cooking the holiday feast each year.
  • Americans eat over 44 million turkeys (averaging 16 pounds apiece) on Thanksgiving. If you put all that meat on a scale, it would weigh 704 million pounds.
  • TV dinners got their start after Swanson overbought 260 tons of turkey. A sales rep named Gerry Thomas suggested they package the turkey with peas, dressing, gravy, and sweet potatoes in tin trays like the airlines used. 10 million trays sold the first year and TV dinners won a permanent spot at the grocery store.
  • Ben Franklin wanted the turkey to be America’s national mascot.  In a letter to his daughter, he wrote “the Turkey is in Comparison (to the bald eagle) a much more respectable Bird.”
  • Studies show it’s not the tryptophan in turkey that makes you sleepy.  It’s the 4500 calories of food you ate on Thanksgiving.
  • 8 in 10 people say they prefer Thanksgiving leftovers.

These Turkey Accents will brighten up your classroom for Thanksgiving.

The Macy’s Thanksgiving Parade Trivia

  • The first Macy’s Thanksgiving parade was in 1924.  It was so popular they got a TV contract with NBC a few years after.
  • The first balloon character was Felix the Cat.  They hadn’t planned to deflate it, so it drifted up and popped shortly after the parade ended.
  • The first parade featured animals from the Central Park Zoo, puppets on floats, and no        balloons.
  • 3.5 million people go to New York City to watch, some arriving as early as 6:30 AM to grab a good spot. Over 50 million watch the parade on TV. 
  • Macy’s parade is the largest float parade in the world. 
  • Sonic the Hedgehog is the first video game character to get a balloon in the parade.
  • Peanuts character Snoopy has the most balloons, with 8 featured in the parade since 1968.

Decorate your bulletin board with this Fall Winter Snoopy Pose Bb Set. 


Holiday Football Facts

  • The first football game played on Thanksgiving was in 1876.  Yale took on Princeton.
  • The Detroit Lions have played every Thanksgiving since 1934.  The only exception was when the players were called to fight in World War 2.
  • The Dallas Cowboys have played all but 2 Thanksgivings since 1966.
  • The Jacksonville Jaguars have never played on Thanksgiving Day.

Need a football to toss with family and friends on Thanksgiving?  We’ve got some:
Coated Foam Ball Football (softer for the kids)  Football Official Size

How Thanksgiving Became a National Holiday

  • George Washington declared a National Day of Thanks on November 26, 1789. He wanted Americans to thank God for protecting them and helping them achieve independence.
  • Thomas Jefferson didn’t want Thanksgiving to be a national holiday. He felt it would violate the First Amendment separation of church and state. 
  • Sarah Josepha Hale lobbied to make Thanksgiving a holiday for decades. Finally, in 1863, President Abraham Lincoln granted her wish. She was also known for writing the childhood favorite Mary Had a Little Lamb.
  • The first U.S. President to officially pardon a turkey was John F. Kennedy.

Welcome guests with this Thanksgiving Allinone Door Décor Kit.  

Thanksgiving Activities for Preschoolers

Turkey Dinner Collage

All you need is some glue, scissors, food clip art you can print out, and paper plates. Have the children cut out their favorite foods and glue them on the plates. (Thanks to PreKinders for this idea.)

Thankful Cards

One piece of construction paper should do. Have them write what they’re thankful for. Encourage them to add a picture they draw or paste on. Studies show that grateful people are happier, get better grades, and don’t get sick as often as ungrateful people.

Thanksgiving Countdown

Make a paper chain with enough links to count down the days until Thanksgiving. Each day a student tears off one link and everyone counts what’s left. (Thanks to Preschool Plan-it for this one.)

We hope you have a wonderful Thanksgiving celebration. If you’d like to share your Thanksgiving traditions with us, we’d love to hear about them!


Wednesday, November 10, 2021

3 Ways to Celebrate World Kindness Day in Your Classroom


Want to know how you can change the world?  Famous actor Morgan Freeman says you do it with “one random act of kindness at a time.”

We hear a lot of people talk about “random” acts of kindness.  What does that mean?  The Oxford Dictionary says anything random is “done without method or conscious decision.”  Perhaps a better word to describe these acts of kindness is “unexpected.” To recipients these acts seem random.  But for those practicing kindness, their acts are planned and intentional.

If you want something to happen, you must be conscious about it and make plans.  That’s why celebrating World Kindness Day is a great way to build the kindness habit. 

How Did World Kindness Day Get Started?

On November 13, 1997, a group of humanitarians came together and decided it was time for a change.  They marked their decision with a “Declaration of Kindness.”  Their purpose became “spreading joy, happiness, and peace by being considerate, compassionate and empathetic towards people and living beings.” 

If you wrote your own Declaration of Kindness, what would you put in it?  How would you spread joy, happiness, and peace to the people around you? 

Your students have lots of ideas on how to be kind to each other.  Make a list and write your own class declaration.  Print it out and hang it on the wall.  Take one act each week and focus on practicing it.  Praise students when you catch them being kind. Have them share their stories of what happened when they were kind to someone else.  Talk about how every act of kindness is an investment in a better future for everyone. 

We’d love to see your declaration and hear your stories!

Play the Compliment Game

A compliment is defined by Oxford as “a polite expression of praise or admiration.”  Abraham Lincoln said everyone likes compliments.  Comedy writer Robert Orben said compliments are “verbal sunshine.” Mark Twain said he could “live for two months on a good compliment.” 

A single compliment can affect the rest of someone’s life.

Since compliments are so powerful, children should learn to master them. 

You can play the compliment game in a variety of ways.  Here are a few ground rules:

·         Everyone must compliment someone else.

·         No one should be left out.

·         The compliment should be sincere.

One way to play is to pass a ball.  When someone catches the ball, they must compliment someone.  When they’re done, they pass the ball to someone else.  Play continues until all students are complimented.

You can also hand out blank cards and assign each student another person to compliment.  Write some sample sentences on the board that they can copy if they wish.  Once the cards are filled out, have the writers deliver them.

Here are some balls for your Compliment Game from Champion Sports.

These framed index cards provide the perfect place to write a short, sincere compliment.

Play Empathy Charades

It’s easier to give sincere compliments when you know people well. 

In this game, have each student come to the front of the class and pick a card.  Written on these cards will be feeling words.  The student then acts out the feeling nonverbally until someone guesses the emotion.

The point of this is to help students understand what others are feeling by reading their faces and behavior.  When you can relate, you can connect.


Donate Toys to Kids Who Need Them

Many kids have more toys than they can play with.  If your students have some they’ve outgrown or don’t play with anymore, another child can give that toy a new life.

Set up a box in your classroom to collect gently used toys.  If possible, take a field trip so your students can see the kids’ faces as they receive the toys.  

Want to donate some new toys to kids who need them?  Check out our selection from Melissa and Doug.

How Kindness Makes You Better

Science tells us that kindness creates:

·         Stronger relationships

·         More satisfaction with life

·         Healthy self-esteem

Each act of kindness is an investment in a better life for you, your community, and the world.   What will you do today to make a better tomorrow for the people around you?

Tuesday, September 28, 2021

National Popcorn Poppin' Month

Celebrate National Popcorn Poppin’ Month This October!


Americans love popcorn!  Recent reports say we eat 17 billion quarts every year.  If you popped all that, you could fill the Empire State Building 18 times, says Lexi Jacobs, author of The History of Popcorn.

Here are a few fun facts about America’s favorite snack:

  •  If you heat popcorn in an open cooker, kernels can fly as far as 3 feet when they burst!
  •  Popcorn has more protein per serving than eggs, roast beef, and cereal grains.
  • You’ll need 1600 popcorn kernels to fill a 1 cup measuring container.
  •  In Colonial America, popcorn was eaten for breakfast with milk, sugar, and cream – a lot like cereal today.

National Popcorn Poppin’ Month was started in 1999 by Agriculture Secretary Dan Glickman.  Why October?  Because this is when popcorn is harvested in the Midwest, where most of America’s popcorn is grown.

How did popcorn get into movie theaters?

Before the Depression, young entrepreneurs started selling popcorn and cracker jacks as they walked up and down theater aisles.  Theater owners were hesitant to buy the equipment needed to serve popcorn, so they hired vendors to cook and sell it outside.  

In 1938, Glen Dickson decided to take a chance.  He bought popcorn poppers and installed them inside all his theaters.  It was expensive, but he made his money back quickly.  Sales of popcorn soared!  Now it’s hard to imagine going to a theater without smelling popcorn.


Class Activities with Popcorn

Make some great memories for your students with these fun activities.

The Milk and Popcorn Mixer

Have you ever wondered what would happen if you mixed milk and popcorn?  Let’s find out!

Start with two plastic cups or glasses.  Fill one with milk and the other with popcorn (already popped).  Have your students start dropping popcorn into the milk, one piece after another.

Then watch what happens. 

The milk will swallow the popcorn and never rise above the rim. Pretty cool, huh?

Homemade Popcorn Shakers

Unleash the musician in your young students!

You’ll need:

  • Toilet paper roll cores
  • Cardboard circles that fit each end of the cores
  •  Popcorn
  •  Paints
  •  Glitter
  •  Colorful markers
  •  Glue or sticky tape

Take the toilet paper core and seal one side.  Insert the popcorn and seal the other side.  Let the kids decorate the shaker however they like.  Then get ready to make some music!

If you want the shakers to be really loud, use unpopped popcorn.

Popcorn Relay Race

You may want to do this one outside.  It can get messy!

Set a bowl of popcorn and an empty bowl at both ends of the relay track.  Give students a cup they’ll use to transport popcorn from the full bowl to the empty one at the other end of the track.  The first team to complete the transfer wins!


Add Some Decorations to Your Celebration

You don’t have to decorate your room with real popcorn to celebrate.  We’ve got you covered!

Classic Accents Popcorn Variety Pack

Popcorn Accents

Classic Accents Popcorn Mini

Serve some popcorn with these Classic Accents Popcorn Boxes.

Award prizes with these Showtime Popcorn Stinky Stickers.


We hope you have fun celebrating National Popcorn Poppin’ Month.  We’d love to hear how it goes for you!

Wednesday, February 20, 2019

St. Patrick's Day Punch


 St. Patrick's Day Green Watermelon Punch


While you are planning your St. Patrick's Day crafts, don't forget the refreshments! Everybody loves a little pop and fizz to their drink. Add some shamrock sparkle to your St. Patrick's Day party with our Green Watermelon Punch.

What You Need: 
1/2 gallon reconstituted green watermelon juice 
1 liter sprite
5 scoops of green sorbet ( or yellow for "pot o' gold")

1. Mix green watermelon juice and sprite in a large punch bowl with ice. 
2. Add 5 scoops of your preferred sorbet. 
3. Top with sliced lemons and limes, for added flavor.
4. Serve with green cups, straws, napkins, and/or spoons.

Complete your party theme with these top o' the line classroom decorations. 


Tuesday, February 19, 2019

Dr. Seuss Crafts for Read Across America Day

 Dr. Seuss Crafts for Read Across America Day

Do you have your books selected for Read Across America Day yet? March 1st is coming up fast, and there's no better way to kick off Dr. Seuss's birthday than with plenty of Dr. Seuss crafts!

Get your class excited about reading with these fun activities that correspond with three classic Dr. Seuss books: The Lorax, The Cat in the Hat, and One Fish, Two Fish, Red Fish, Blue Fish.


Book: The Lorax
Craft: Truffula Trees

What You Need:
Striped Paper Straws
Cotton Balls
Liquid Watercolors
Liquid Glue
Spray Bottle
Plastic Zip Bags

1. Put a little of each desired water color into spray bottles. Put one or two squirts of each color into a separate plastic bag.
2. Add 3 to 5 cotton balls to each bag and seal the bags up. Shake until your cotton balls are coated with the paint color.
3. Gently remove the cotton balls and set them on paper to dry.
4. Once the cotton balls have dried, attach these to the ends of your paper straws using regular liquid glue or a glue gun. Display your cotton candy colored trees for all to see!


Book: The Cat in the Hat
Craft: Thing 1 and Thing 2

What You Need:
Toilet Paper Tubes
Red and Teal Finger Paint
White Card Stock
Glue
Scissors

1. Paint one hand teal blue, and press it onto a sheet of the white card stock. Lift up the hand quickly instead of sliding it to prevent the hand print from smearing. Repeat this step twice for two total hand prints per child. Allow paint to dry.
2. Paint two toilet paper tubes with bright red paint. For bolder, brighter color, do two coats of paint on each tube. Allow paint to dry.
3. Cut the hand prints out, leaving a little white space around the edges. 
4. Cut two small slits, one on each side of the tubes, and slide your hand prints down into the tubes. Keep the hand print in place by adding glue.
5. Draw your own or download these printable faces and labels. Glue the faces and logos into place as shown. Let the glue dry.
6. These super-cute finger puppets make great reading companions!


Book: One Fish, Two Fish, Red Fish, Blue Fish
Craft: Hand Print Fish

What You Need:
White Paper or Card Stock
Black Marker
Glue

1. Use any colors you like for the "One Fish" and "Two Fish." Paint your hand and press it down onto the paper to make one full hand print for the "One Fish." Make another full hand print going the opposite way for the "Two Fish." Then, for the second hand print on the "Two Fish," only press down your thumb and forefinger. Make a full hand print with red paint for the "Red Fish" and another full hand print with blue paint for the "Blue Fish." Be sure to alternate which direction the hand prints are facing on the paper.
2. Using your black marker, draw a mouth and gills on each of your fish, and glue on your googly eyes. 
3. Label your fish when done. 
For some awesome Dr. Seuss-themed decorations, click here!  
Let us know what you are doing for Read Across America!

Wednesday, November 14, 2018

10 Best Christmas Crafts for Kids

Christmas Crafts for Kids: Edible and Decorative Activities for your Classroom


Looking for creative new Christmas crafts to engage your class? Tired of doing the same activities year after year? This collection of our ten best Christmas activities for kids will provide hours of fun festivities for your little ones. Below you will find 5 decorative & 5 edible craft ideas! Edible crafts make delicious holiday snacks, while decorative crafts make festive decorations for your classroom or Christmas gifts to take home to mom and dad!

Top 5 Decorative Christmas Craft Ideas: 


1. Rudolph Frame


http://purefunsupply.blogspot.com/2017/12/rudolph-frame.html

Of course everyone's favorite reindeer deserves a spot on your Christmas craft list! Put a class photo inside to complete this cute take-home craft!

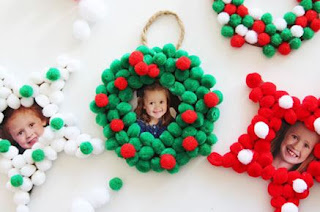
http://purefunsupply.blogspot.com/2017/12/pom-pom-ornaments.html

Decorate your classroom or school tree with these colorful Christmas ornaments, personalized with the picture of the child artist who made them!


3.  Holiday Hand Prints


http://purefunsupply.blogspot.com/2015/12/holiday-craft-and-gifts-ideas-holiday.html

 Put a fun holiday spin on traditional hand prints with this easy craft for kids of all ages!  We'll show you how to make reindeer, snowmen, or Santa Claus! Use these to decorate the front of handmade Christmas cards, t-shirts, or bulletin board and hanging decorations.


4.  Reindeer Prints


http://purefunsupply.blogspot.com/2015/12/holiday-crafts-gift-ideas.html

A similar Christmas craft is this adorable reindeer fingerprint design, easily modified for kids of all ages and decorations of all sizes!


5. Christmas Tree Plate


http://purefunsupply.blogspot.com/2016/12/christmas-tree-plate.html


Make this gem of a Christmas tree sparkle and shine with glitter, stickers, beads, and any other "ornaments" you may find!


Top 5 Edible Christmas Craft Ideas:


1. Christmas Graham Cracker House


http://purefunsupply.blogspot.com/2016/12/christmas-graham-cracker-house.html

Forget the gingerbread house! Hansel and Gretel would agree, this graham cracker house is sweet enough to eat! Check out our CACFP-approved graham cracker bears! For more CACFP-approved goodies, check out our full listing here!


2. Peanut Butter Pretzel Reindeer


http://purefunsupply.blogspot.com/2016/12/reindeer-treats-for-classroom.html

Another neat graham cracker treat is this friendly Rudolph snack! For an allergen-friendly treat, use any type of seed butter or peanut butter alternative and gluten-free pretzels.


3. Strawberry Banana Candy Cane


http://purefunsupply.blogspot.com/2014/12/healthy-holiday-snacks-christmas.html


Simple, sweet, and healthy to eat, this candy cane won't hang around for long!


4. Strawberry Banana Santa Claus


http://purefunsupply.blogspot.com/2014/12/healthy-holiday-snacks-christmas.html

Don't miss putting these precious mini Santa's on your Christmas snack list this year!


5. Celery Celebration Tree


http://purefunsupply.blogspot.com/2014/12/healthy-holiday-snacks-christmas.html


Trim this tree with any assortment of veggies for a very merry healthy holiday snack!


We love Christmas and Holiday craft ideas here at PureFUN! Supply! They keep us smiling! We would love to see your students creations! Like us on Facebook and post a picture of your students with their work!
Also, comment below and tell us which craft you will try this December!


Friday, November 2, 2018

Fun Fall Crafts for Kids


While the weather gets colder, stay warm and cozy with these fantastic indoor crafts in fabulous fall colors. Try these with your class or with your kids at home over Thanksgiving break!


Fall Luminaries

Use these warm and inviting luminaries to decorate your classroom or let your students take them home as gifts! This craft will help younger children work on their fine motor skills, while older children will have fun using creativity to make their luminaries more elaborate.

What You Need:
Mason Jars
Mod Podge
Candles (tea candles are the perfect size!)
Wet Wipes (or wet paper towels)

1.Tear your colored tissue paper into small strips. 

2.Cut a tree shape out of brown construction paper. (You can make your tree as simple as the photo above or add more branches, etc.)

3.Using your paintbrush, coat the outside of your mason jar with mod podge. Then quickly adhere the tissue paper and the tree to the mod podge before it dries. You might want to do this part in sections since mod podge dries pretty quickly. You may want to keep wet wipes or a wet paper towel handy since the mod podge will also make your hands pretty sticky!

4.After you have attached all of your tissue paper, put a final coat of mod podge over everything.

5. Stick your candle inside the jar, light it, and turn off the lights for a fantastic fall display. You may want to use battery operated candles with young children, or you can simply forgo the candles and display your colorful mason jars without. 


Pumpkin Moon Sand

Tactile activities are great for young children, and this one smells just like pumpkin pie! Using play sand and a few ingredients from your kitchen, you can make this engaging sensory tool for hours of play!

What You Need:
Play Sand (4 Cups)
Corn Starch (2 Cups)
Water (1-3 Cups)
Pumpkin Pie Spice (1 Tsp)
Orange Food Coloring or Powdered Paint (optional)

1.Mix play sand, pumpkin pie spice, and corn starch together in a large container.

2.Add desired amount of coloring or paint.

3.Slowly mix in water until the mixture reaches your desired consistency. More water = slimier consistency. Less water = play dough consistency. 

4.Use scoopers, buckets, or hands only to play in the sand. When finished, leave your moon sand in an uncovered container to dry. (Do not seal it until it is completely dry, or there will be mold!) Once it is dry, you can seal it in a closed container or plastic bags. Just add water the next time you want to play!

Terrific Turkey Craft


What are YOU thankful for? Inspire gratitude and get your students in the Thanksgiving spirit with this cute, colorful, and easy-to-make craft!

What You Need:
Googly Eyes (or White and Black Construction Paper to make your own)
Glue
Markers
Scissors

1.Turn your brown paper bag upside down so that the opening is facing you, and write what you are thankful on the body of your bag.  
2.Glue a pair of eyes to the top of your bag. 
3.Cut an oblong, tear-shaped beak for your turkey and a bright red snood (term for the red fleshy bit that hangs over the turkey's beak). Glue those just below the eyes.
4. Deck out your turkey with festive feathers on the backside of the bag behind the turkey's face.

Fall crafts for kids


Fall Fox Craft for Child Care Students


Supplies:
* Large Paper Plate
* Orange tissue paper
* White School Glue
* Scissors
* Orange/White construction paper
* One Large Brown Pom Pom
* Stapler

Directions:
  • Trim down your paper plate so it looks like a triangle/fox’s face.
  • Cut the orange tissue paper into 2×2 squares.
  • Slather glue over the paper plate
  • Have your students place the orange tissue paper on their plate.
While your students are covering their paper plate with tissue paper :
  • cut out two triangles out of the orange construction paper  and two circles out of the white. This will be the fox’s ears & eyes.
Finally:
  • Have your students glue the eyes on and then you can staple the ears to the paper plate.
  • Then add the brown pom pom where the nose would be and you have a fox!

Did you try this craft? We would love to see your students creativity! Share your picture with us on our facebook page at: https://www.facebook.com/PureFUN-Daycare-Supplies-Superstore-142153462482252/


The Bery Brown Bear


Supplies:


a stapler


shaving cream

a paint brush

a plastic fork

scraps of construction paper

scissors

a glue stick

Directions:

Start by mixing up your paint:

"Puffy Paint" recipe:  Mix equal parts white school glue and shaving cream.  For this craft you will add brown paint to make a brown bear.

Next, prepare your bear's face:

Cut two small circles out of one paper plate and staple them to the top of another paper plate to be the bear's ears.  The staples will be covered up by the paint.

Now, time to paint him up!   Make the paint nice and thick.  Glob it on. It may take some time to dry, so have your students begin to make the other parts of the bear.

Cut out 2 pink circles to go in his ears, 2 black circles for eyes, a brown snout shape, and a black oval for his nose. 

Use a glue stick to attach them. 

Finally draw a mouth for your Berry Brown Bear.

A perfect pairing for your craft is to read Brown Bear Brown Bear by Bill Martin Jr & Eric Carle during your story time!

Tuesday, October 16, 2018

Halloween Critter Crafts


Ready for some trick or treating fun? Crafting these creepy critters will get your little ones into the Halloween season's spooky spirit!

Paper Tube Bats

What You Need:
Construction Paper (Black, White, and Assorted Colors)
Paper Tubes (such as toilet paper rolls)
Glue or Tape
Scissors

1. Cut enough colored paper to cover your tube, and apply with glue or tape. Fold the paper in at the top and bottom of the tube to create the bat's ears and feet.
2. Draw a template for your bat wing, then cut two wings out of your black paper.
3. Attach the two wings to back of your bat.
4. Glue/tape googly eyes onto the top of the bat.
5. Cut two tiny triangles out for the bat's fangs and glue/tape those just below the googly eyes on the bat's face.
6. Attach to your bulletin board or hang from the ceiling for an awesome Halloween display!

Paper Bag Monsters

What You Need:
Construction Paper (Assorted Colors) 
Circle Punches (optional)
Markers
Glue or Tape
Scissors
Stickers, Glitter, and/or other Embellishments (optional)


1.Choose a paint color and paint your bag, leaving the bag open to dry to prevent the paint from sealing it shut.
2.Once the paint has dried, add embellishments as you wish. Cut out horns, teeth, and tongues. Make your monsters colorful and crazy, silly or scary!
3.Put on a monster puppet show!

Monday, October 15, 2018

DIY Halloween wreath for Kids


What you need:
– Paper plate or a cereal box
–Black paint
– Black,Purple,Green and Orange Tissue paper 
–Glue
– Orange construction paper
– Ribbon or String for hanging
-Wiggle Eyes

Creating the Spider:

1.      Using orange construction paper, have your child use both hands to make the hand prints on top of each other facing opposite ways to represent the spider like the one above.
2.       Once it dries you can add wiggle eyes.

Creating the Wreath Back Drop:
1.       Cut up your tissue paper into small squares
2.       Cut the middle out of your paper plate to create the wreath shape. If you use an old cereal box, round the corners and then cut out a hole in the middle.
3.       Start scrunching up the squares of tissue paper and apply with glue onto the paper plate wreath .

Finalizing your DIY Halloween Wreath:

1.       Once your hand print spider has dried, cut around each finger to give the appearance of the spider
2.       Ensure that the tissue paper has dried and then glue the spider on the top
3.       Finally when you’re done adding the spider to the wreath, tie a string or a cute ribbon around it so you can hang it on your child's door!

For more craft Ideas, be sure to check out our blog at purefunsupply.blogspot.com